


How Can I Use Disk Utility to Format NTFS Drives on Mac?
- Support
- Dynamic News
- Kate
 1922
1922- 2023-11-16 14:01:07


MacOS offers robust features for managing various types of storage devices. However, when it comes to dealing with external drives, storage devices, and cross-platform data sharing, having the ability to format NTFS drives on your Mac can be invaluable. NTFS is the standard file system for Windows, and while macOS uses its own file systems, like HFS+ and APFS, it's not natively compatible with NTFS.
In this article, we will explore how you can use Disk Utility to format NTFS drives on your Mac. Let us look at why you need to format NTFS drives and how to solve the problem of not supporting written NTFS drives on your Mac.
Quick Guide to Learn:
1. Part 1. Why Need to Format NTFS Drives on your Mac?
2. Part 2. Use Disk Utility to Format NTFS Drives on Mac
3. Part 3. Alternatives to format NTFS Drives on Mac
Part 1. Why Need to Format NTFS Drives on your Mac?
If you use both Windows and Mac systems, you may encounter situations where you need to format an NTFS drive on your Mac. NTFS is the default file system used in Windows, and Mac systems typically support read-only access to NTFS drives. However, there are instances where you may want to format an NTFS drive on your Mac to make it compatible with both operating systems or to repurpose the drive for Mac-specific use. Formatting allows you to erase the content on the drive and configure it with a different file system, such as macOS Extended (HFS+), exFAT, or FAT32.
Part 2. Use Disk Utility to Format NTFS Drives on Mac
Disk Utility is a utility application for macOS that allows users to manage and maintain their storage devices. It provides a graphical interface for performing various disk-related tasks, such as formatting, partitioning, and repairing disks, enabling users to format their storage devices with different file systems, such as HFS+ (Mac OS Extended), APFS (Apple File System), exFAT, and even NTFS with some additional steps.
Step 1. Go to "Launchpad" > "Utilities" > "Disk Utility" on your Mac.

Step 2. From the sidebar, select the NTFS drive you want to format.

Step 3. Click on the "Erase" button on the toolbar. In the prompt, choose a format such as ExFAT, FAT, or macOS Extended (Journaled) to reformat the drive temporarily.

Step 4. Review the chosen settings and click on the "Erase" button to proceed. Disk Utility will start the formatting process, transforming the drive into the desired format.

Part 3. Alternatives to format NTFS Drives on Mac
If you're looking for ways to achieve read-write access to an NTFS drive on macOS without formatting it, there are alternative methods you can try.
Method 1. Use Kingshiper NTFS for Mac to Get Writable Access
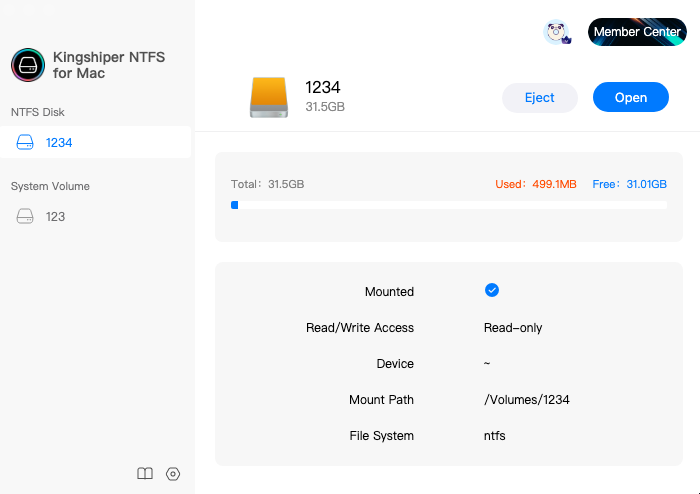
Kingshiper NTFS for Mac is another third-party NTFS driver that provides read and write access to NTFS-formatted drives. It doesn't directly format drives to NTFS but allows you to work with existing NTFS drives without formatting. This can be useful if you have an NTFS drive but want to be able to read and write to it without reformatting. Plus, Kingshiper NTFS for Mac allows you to eject your external drives safely through one simple click when you’ve finished your work. With this feature, you don't have to worry about any errors or issues that may occur during the ejection process.

Step 1. Launch Kingshiper NTFS for Mac on your Mac.
Step 2. Connect an NTFS drive to a Mac, and Kingshiper NTFS for Mac will automatically detect the device.

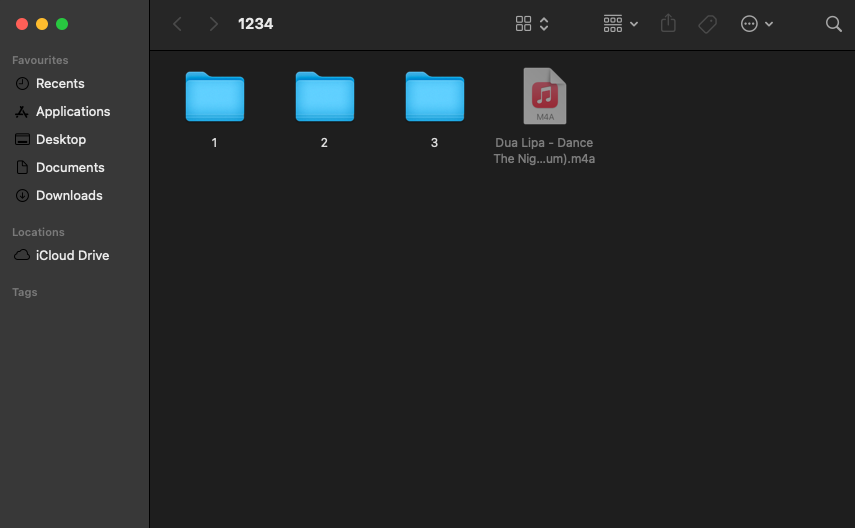
Step 3. Click "Open" and then you can check, read, write, and modify saved data on the NTFS device.
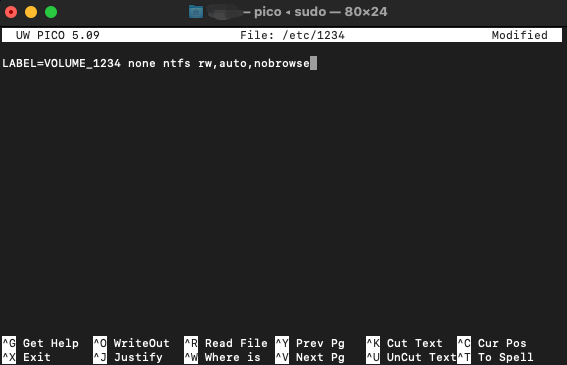
Method 2. Use Terminal Command Line to Get Writable Access
If you're comfortable using the Terminal and need a read-write solution for NTFS drives without formatting, you can use Terminal commands to mount NTFS drives with writable access, which is a powerful and flexible approach. This method allows you to gain full control over NTFS-formatted drives without needing to format them to a different file system. By utilizing Terminal commands to mount NTFS drives, you can seamlessly interact with the files and folders on these drives, making modifications, additions, or deletions as needed.
Step 1. Click "Launchpad" > "Utilities" > Find and open "Terminal".
Step 2. When the Terminal window pops up, type the command: sudo nano /etc/1234(replace 1234 to your drive name).
Step 3. Type command line: LABEL=NAME none ntfs rw,auto,nobrowse (Change the NAME with your drive name.).
Step 4. Press Ctrl+O and press Enter to save the file.
The Bottom Line
By now, you must master how to use Disk Utility to format NTFS drives on Mac. But If you prefer to retain data and achieve read-write access, alternative methods such as Kingshiper NTFS for Mac or using Terminal commands can be explored. Choose the method that best suits your requirements and enjoy seamless interaction between macOS and your NTFS drives from now on.
You May Also Like
1. Top 3 Options to Copy Files to NTFS on Mac, 100% Free
2. Quick Fixes: Can’t Safely Remove External Hard Drives on Mac


