1 Get Started
It is simple to download, install, purchase, and activate the software. Follow the steps below.
1.1 Download & Install
Step 1. Download it on Your PC
If you don't have Copilot ReWin11 yet, click the button below to download it. Or visit here to download it.

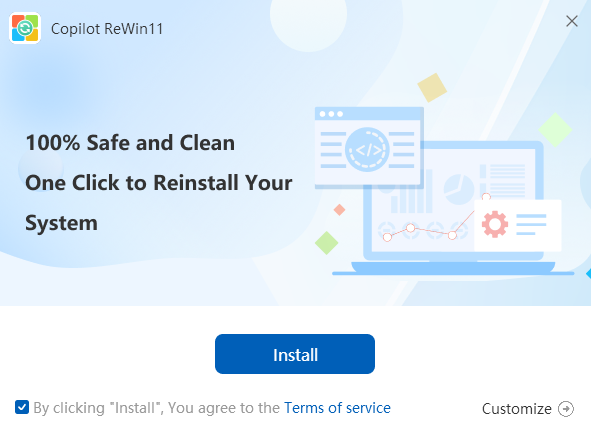
Step 2. Install Copilot ReWin11
From the pop-up window, you can click the Install button to install our product as the default, or you can choose the “Customize” option.
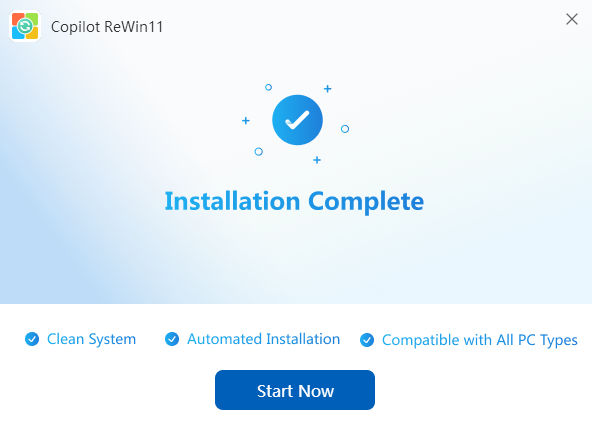
Step 3. Launch Copilot ReWin11
It will take seconds to install Copilot ReWin11 successfully. A window like the below will prompt you that you can click the “Start Now” button to open Copilot ReWin11 at once.
1.2 Login with Kingshiper Account(Register) & Update & Uninstall
1.2.1 What is Kingshiper Account?
Kingshiper Account refers to the account you created from one of the Kingshiper products. It helps you manage your order details and log in to Kingshiper products that support Kingshiper Account.
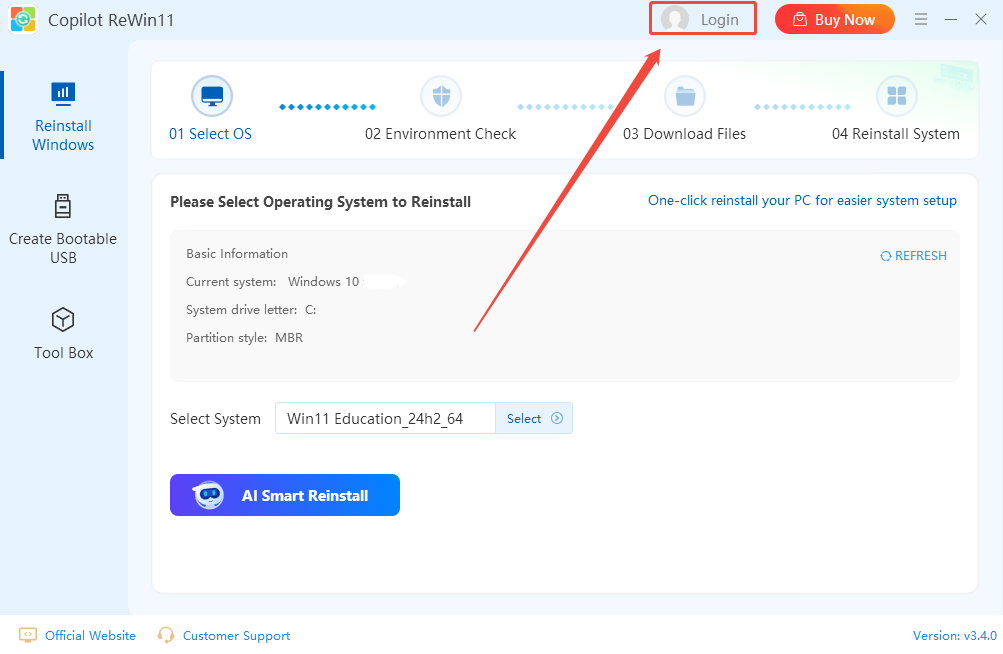
1.2.2 How to log in to Copilot ReWin11?
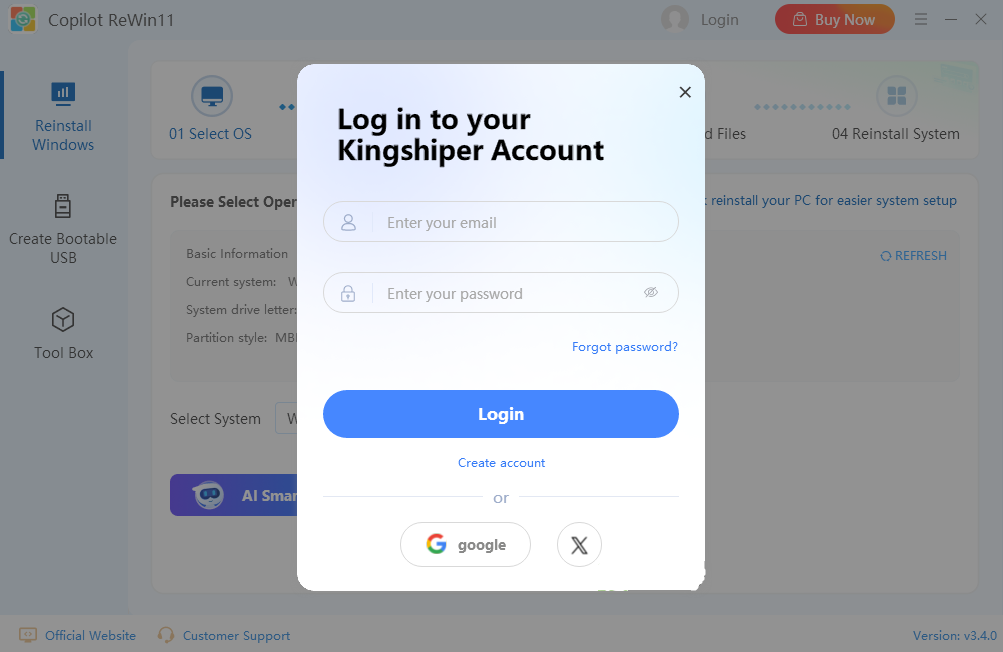
Launch Copilot ReWin11 after installation, and click the “Login” button in the upper right corner to get a login window.
Then, log in to the program with your Kingshiper Account.
1.2.4 How to sign up for a new Kingshiper Account.
If you don't have a Kingshiper Account, then you need to click the Create account here option on the initial interface and create a new account.
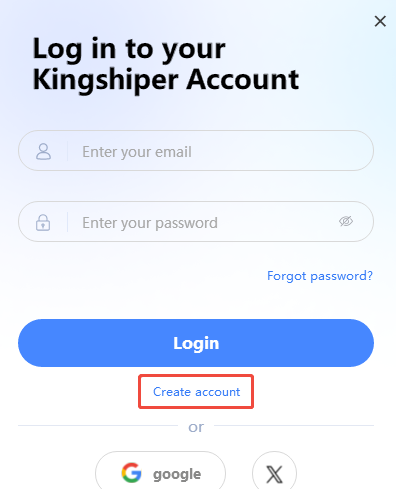
You'll get a new interface to enter your email address and set a password, and then click the “Create Account” button to create the account.

1.2.5 What can you do with Kingshiper Account?
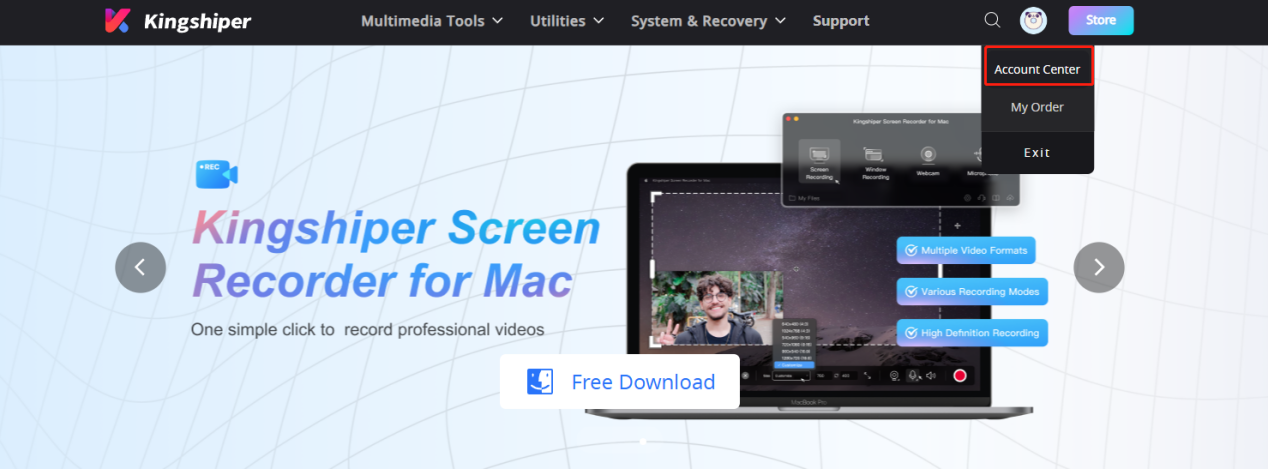
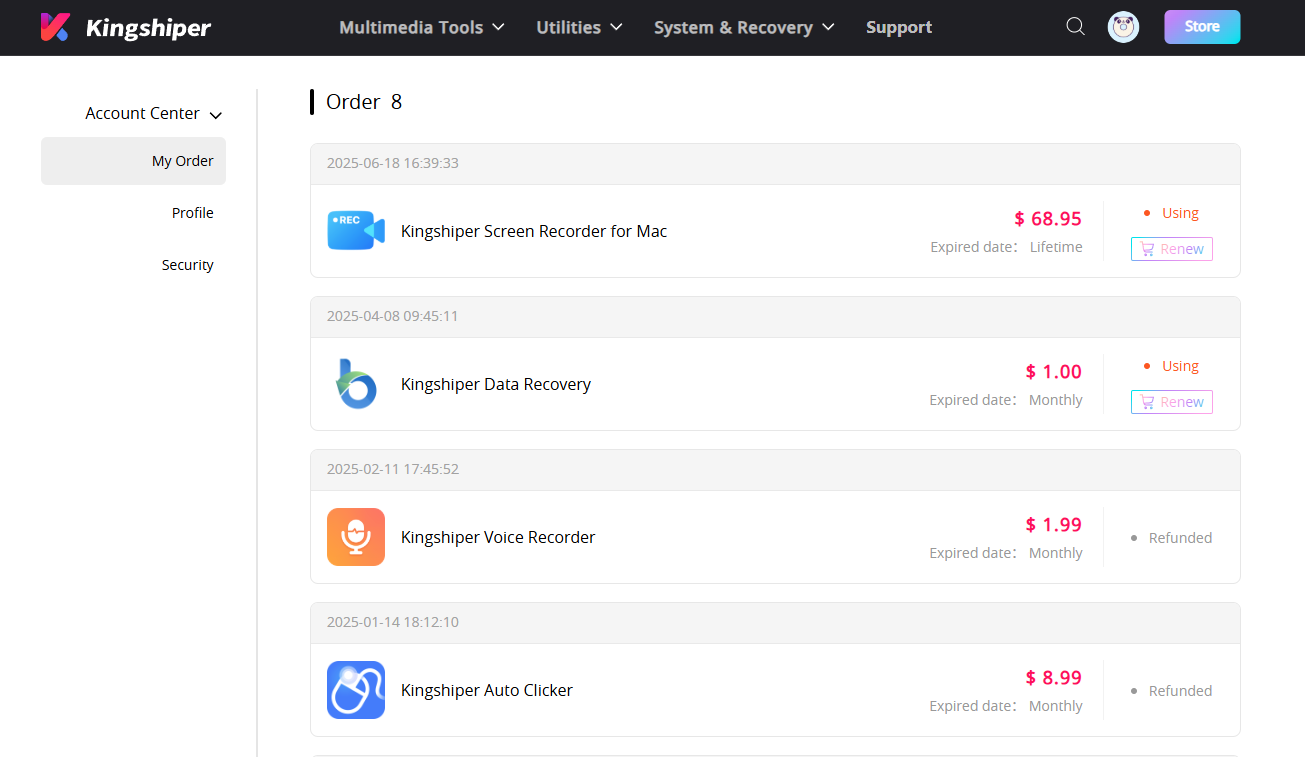
Go to the Kingshiper official website and log in. Click on the Person icon, then choose “Account Center”. You can edit your profile, change your password, and check your order on this page.
My order: You can find the Order, Profile, and Security information here.
Profile: You can edit your personal information from this tab.
Security: You can change your password here.
1.2.6 Update
If you want to check if your Copilot ReWin11is the latest version and update it, you can follow the steps below to update automatically.
Step 1. Check for Updates.
Go to the “Menu” icon, and click the “Check for Updates”. It will pop up a Live Update window. Please press “Go to Update” to download the package.

Step 2. Update the package.
After downloading the latest version, please press “OK” to terminate the program and install the new version from the pop-up window. You can also click "Cancel” to install it next time.
1.2.7 Uninstall
If you think Copilot ReWin11hasn't met your expectations or you don't want to use it now, you can uninstall it as below:
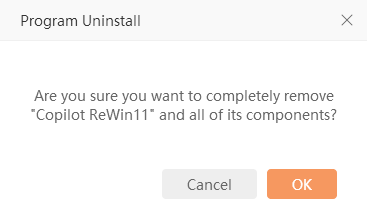
Go to “Control Panel” > “Programs” > “Programs and Features” > “Uninstall” and then right-click the icon of Copilot ReWin11and select Uninstall. Click “OK” when asked "Are you sure you want to completely remove Copilot ReWin11 and all of its components?"
1.3 Brief Introduction
Thank you for your interest in Copilot ReWin11. Copilot ReWin11 is a smart and AI-powered system reinstallation utility designed to provide a clean, secure, and fully automated way to reinstall Windows. Built for both beginners and advanced users, it supports Windows 7, Windows 10, and Windows 11, and works seamlessly on desktops, laptops, and all major PC brands. It is an all-in-one installation solution that simplifies the complex process of system reinstallation.

2 How to Use Copilot ReWin11
2.1 Key Features
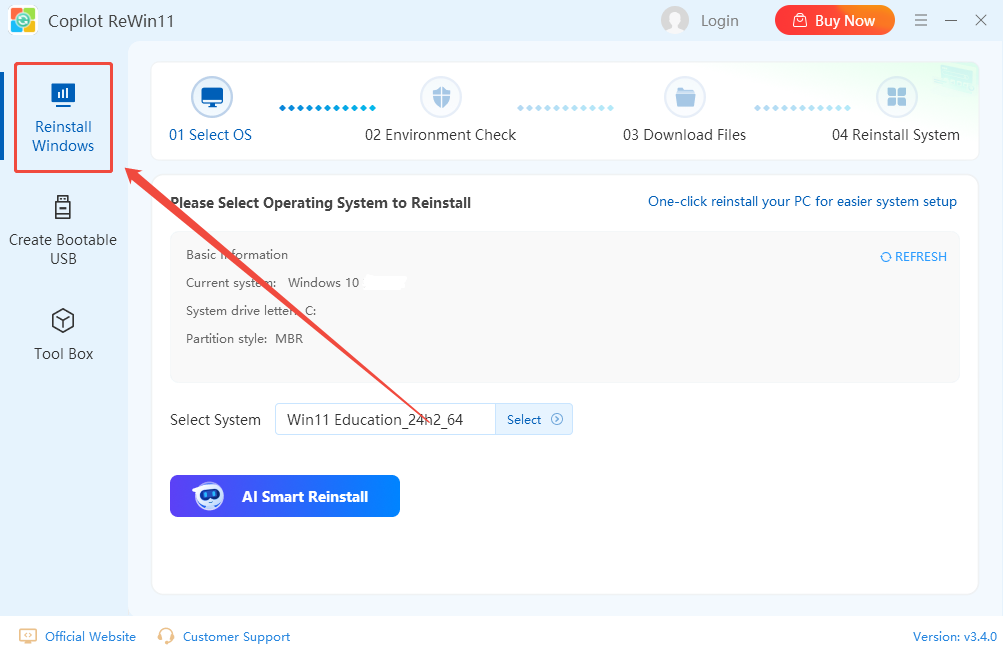
2.1.1 Reinstall Windows
This feature lets you refresh or rebuild your system in one click. It supports reinstalling your current Windows version, switching to another version, rolling back to an older release, or upgrading to the latest system.
2.1.2 Create Bootable USB
The “Create Bootable USB” feature lets you quickly turn a USB drive into a Windows installation tool. It writes a WinPE system to your USB stick and supports Windows 7, Windows 10, and Windows 11. With this
tool, you can reinstall or repair Windows on any compatible device.
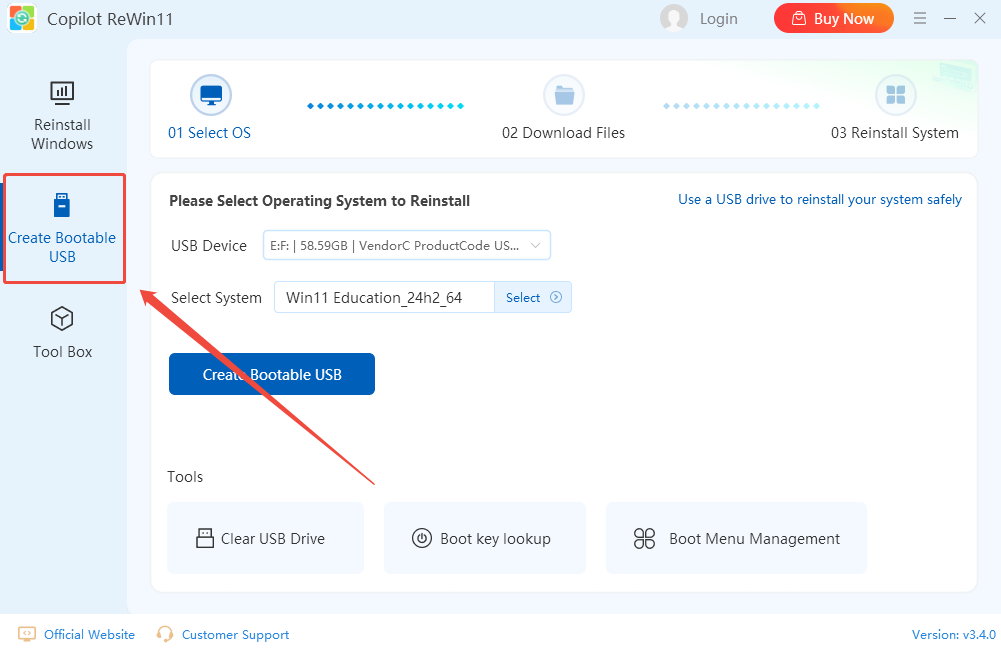
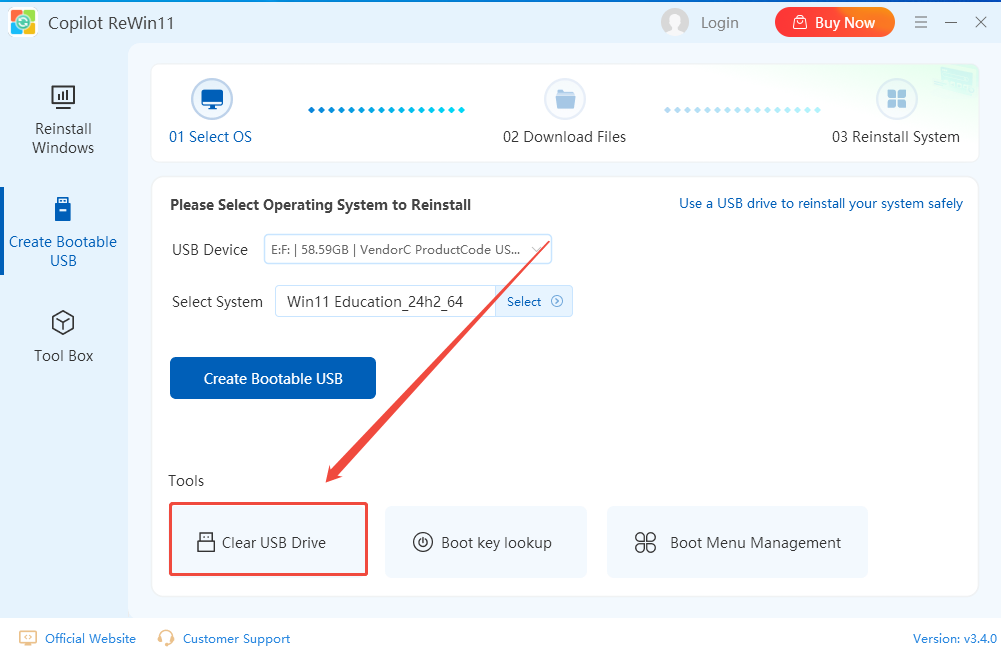
2.1.2.1 Clear USB Drive
It allows you to wipe all data from your USB drive with a single click. It helps you quickly reset the drive to a clean state, making it ready for creating a bootable USB or storing new files.
2.1.2.2 Boot Key Lookup
This tool helps you identify the correct key to access your computer’s boot menu. You can select your device model from the list, or refer to common boot keys for popular brands

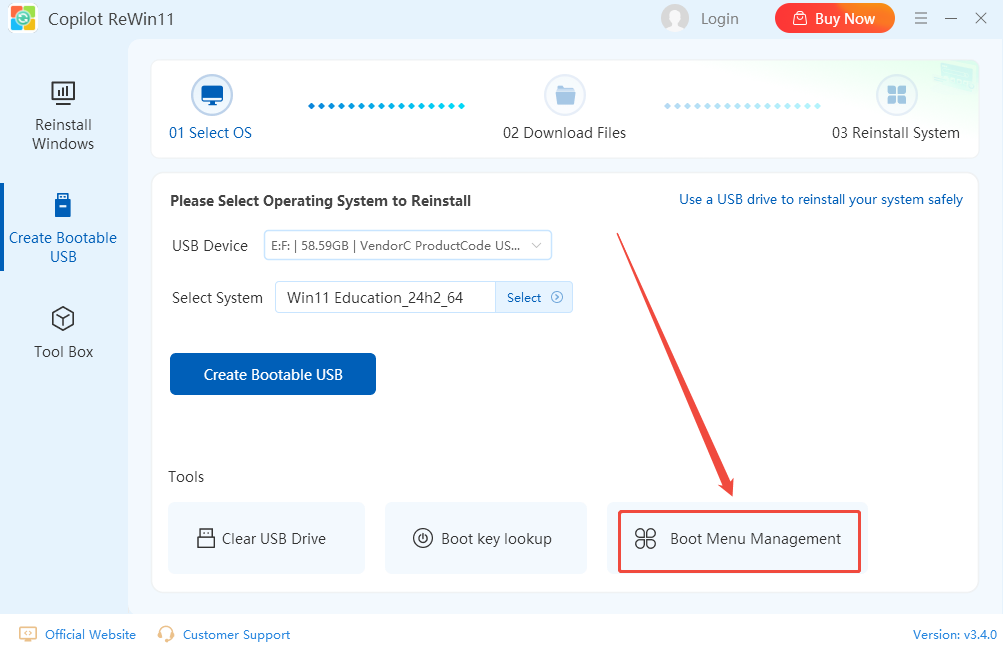
2.1.2.3 Boot Menu Management
The “Boot Menu Management” feature lets you organize and control the operating systems listed in your boot menu. You can remove unwanted systems so they won’t appear or load during a future Windows reinstall, helping streamline your boot process and avoid conflicts.
2.1.3 Tool Box
Here, you can find a handy collection of essential productivity tools. Simply browse the available tools, and with a single click, you can install the one you need.
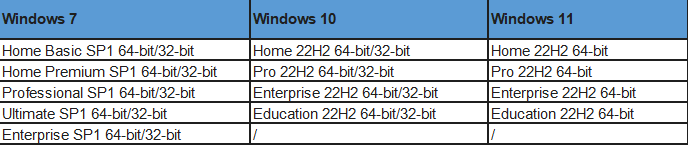
2.2 Supported Windows Versions
Copilot ReWin11 supports reinstalling Windows 7, Windows 10, and Windows 11, with a full range of versions available for each system.
You can find detailed version information here:
Windows 7 versions: Click here to learn more >>
Windows 10 versions: Click here to learn more >>
Windows 11 versions: Click here to learn more >>
3 Step-by-Step Tutorials
3.1 How to Reinstall Your Windows Computer
Step 1. Launch Copilot ReWin11 on your computer and click on the “Reinstall Windows” feature.
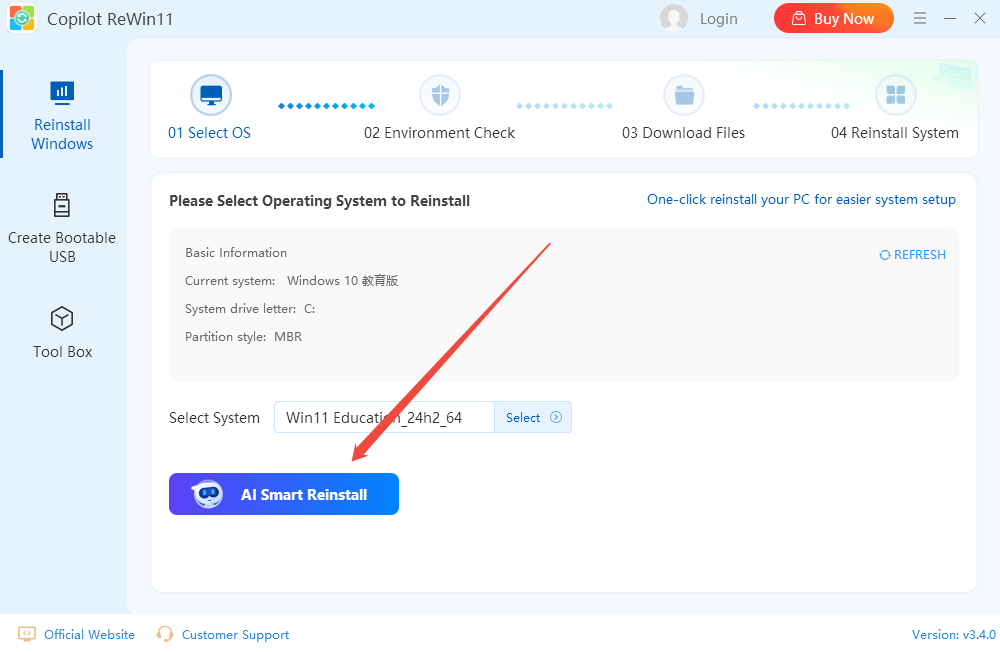
Step 2. Then, it will display your current system version. Click on the “Select” button to choose the Windows version you want to reinstall, and click “OK”.
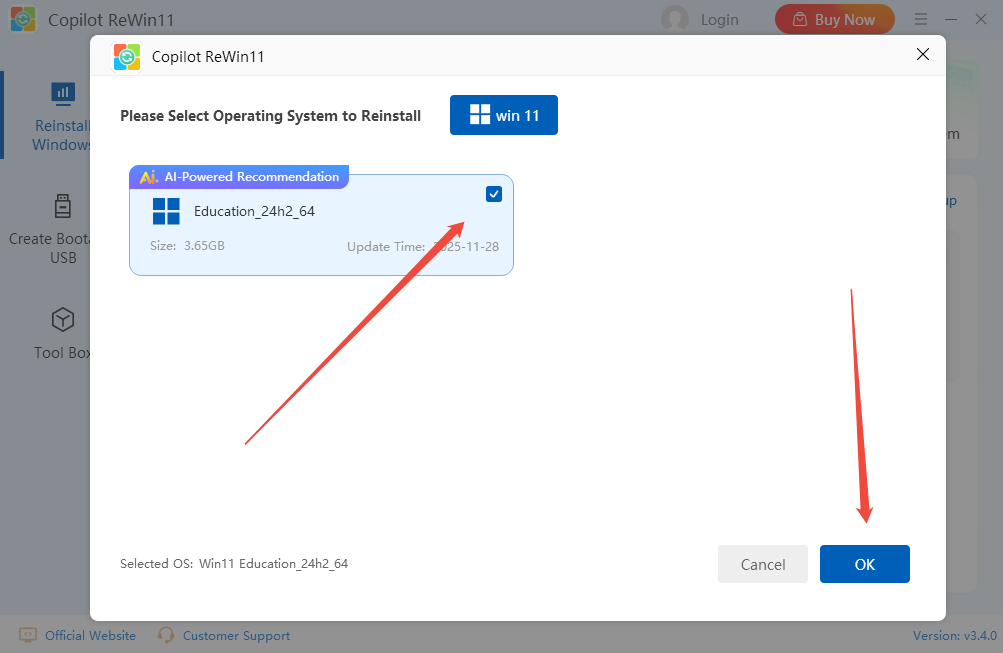
Step 3. Click “AI Smart Reinstall” to proceed.
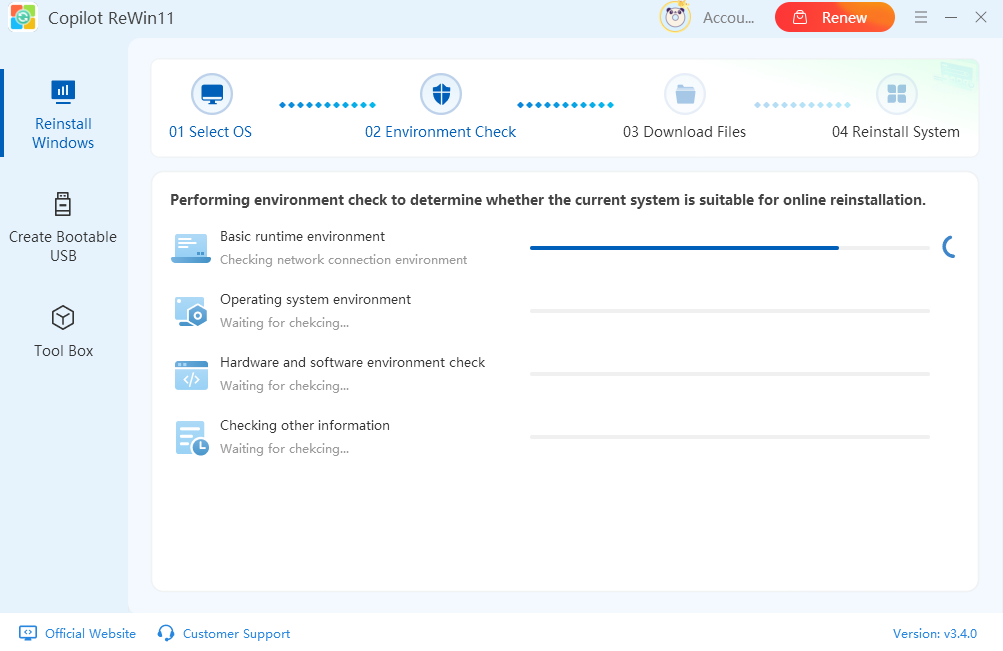
Step 5. Copilot ReWin11 will scan your computer to ensure it meets the requirements:
Step 6. Once the system check is complete, it will begin downloading the necessary files. Please wait while the software prepares all the required files and data for the Windows version you selected.
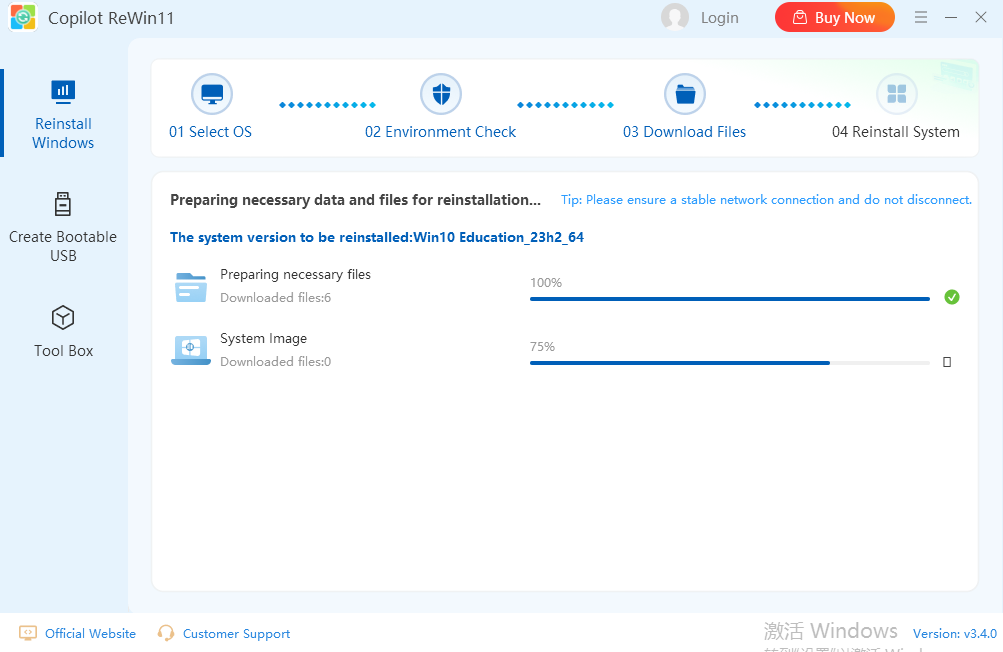
Step 7. Please wait while the software prepares all the required files and data for the Windows version you selected.
Step 8. Once the preparation is complete, choose when to restart. Here, click “Restart Now”, and your computer will immediately begin the reinstall process.
Step 9. Once the reinstallation is complete, a confirmation message will appear indicating that Windows has been successfully reinstalled. You can then start using your refreshed system immediately.
Note: If you are performing a system upgrade or downgrade, an additional system configuration step will be required.
3.2 How to Create a Bootable USB Drive
Step 1. Prepare an empty USB drive with at least 8 GB of storage and plug it into your computer.
Note: Temporarily disable any antivirus software during this process. Some antivirus programs may mistakenly flag the system files as threats, which could cause the creation process to fail.
Step 2. Launch Copilot ReWin11 and tap on the “Create Bootable USB”, then choose your USB drive from the list of available devices.
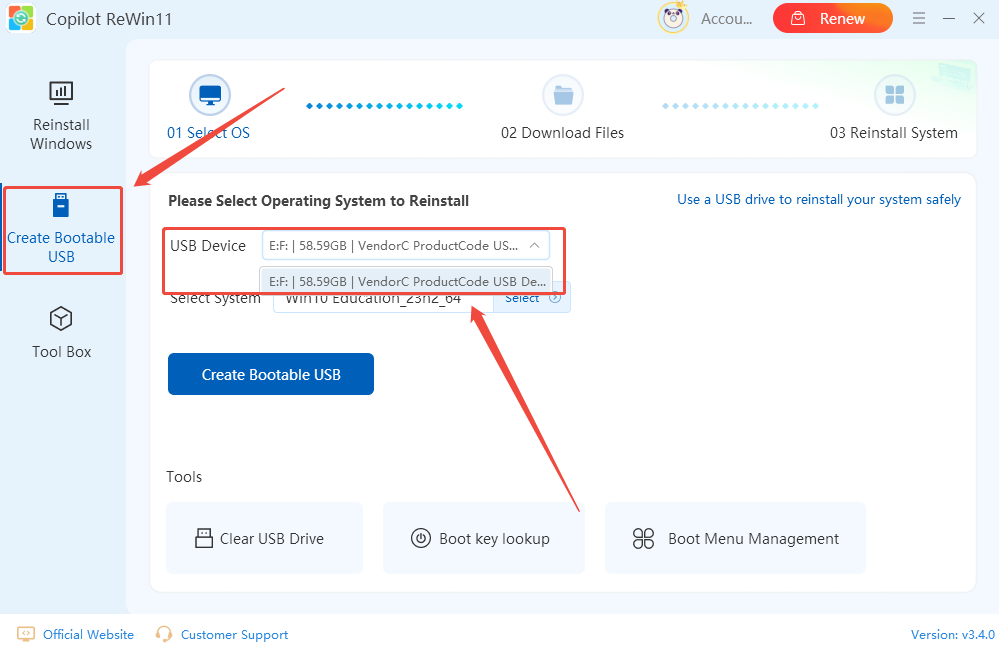
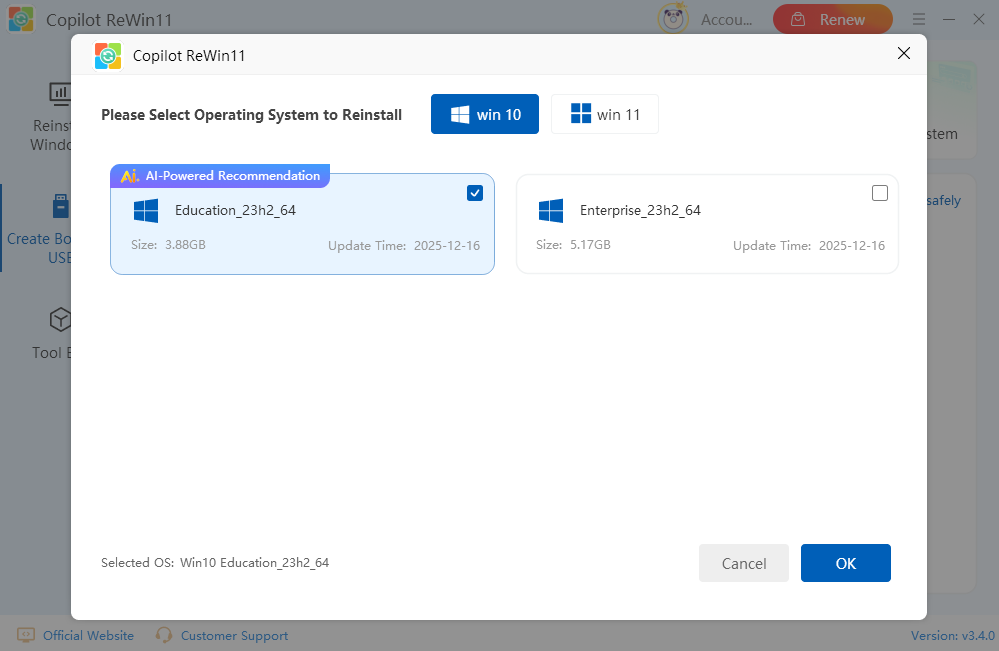
Step 3. Click “Select” in the “Select System” section, choose the Windows version you want to install (Windows 7, Windows 10, or Windows 11), and click “OK”.
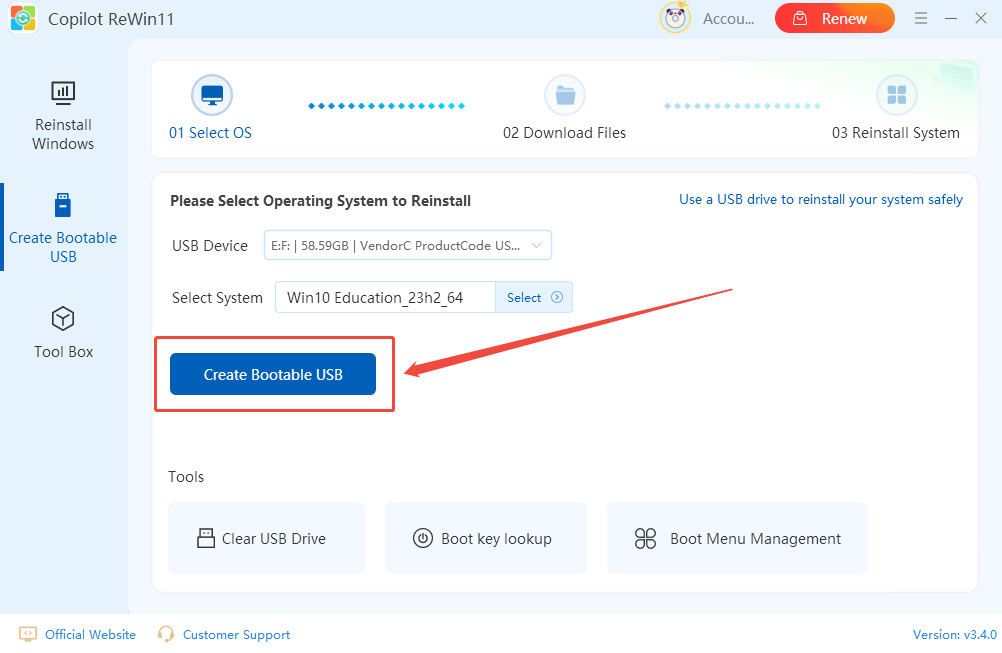
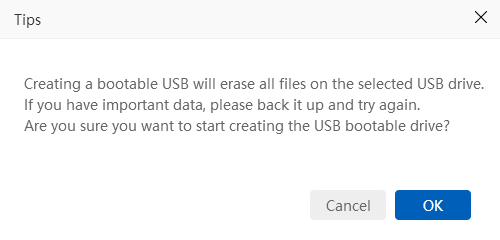
Step 4. Click “Create Bootable USB” to start. It will warn that all files on the USB drive will be erased. Click “OK” to continue.
Step 5. Then, it will format the USB drive. Once formatting is complete, click “OK” to proceed.
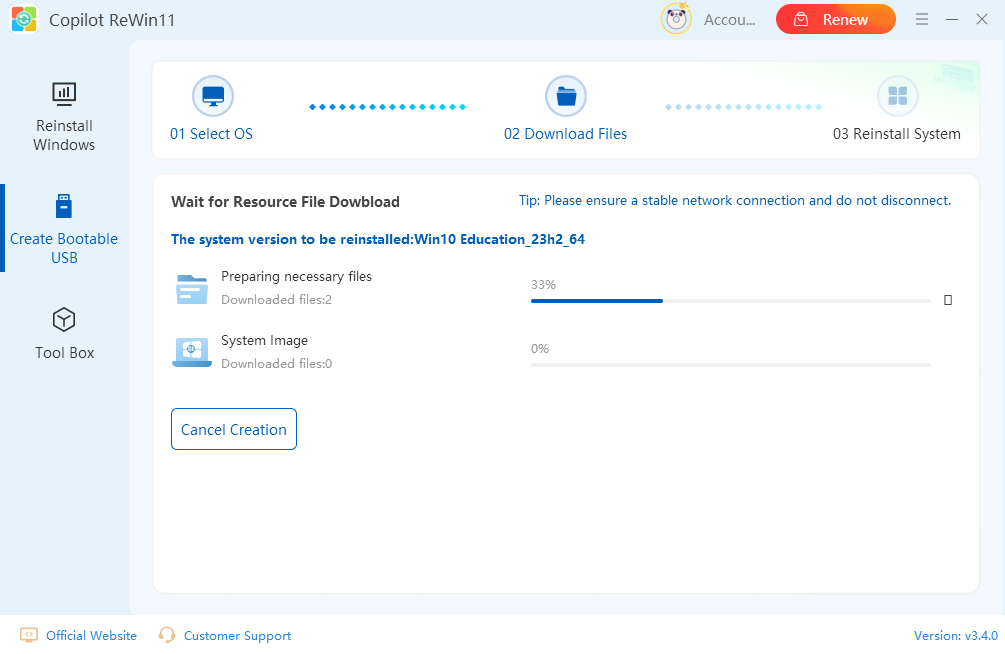
Step 6. Copilot ReWin11 will prepare all necessary files and system data for your selected Windows version. This may take a few minutes depending on your internet speed and system performance.
Step 7. The required files and system image will be automatically copied to the USB drive. Wait patiently until the process finishes.
Step 8. Once the copying is complete, your bootable USB drive is ready to use for reinstalling or repairing Windows.
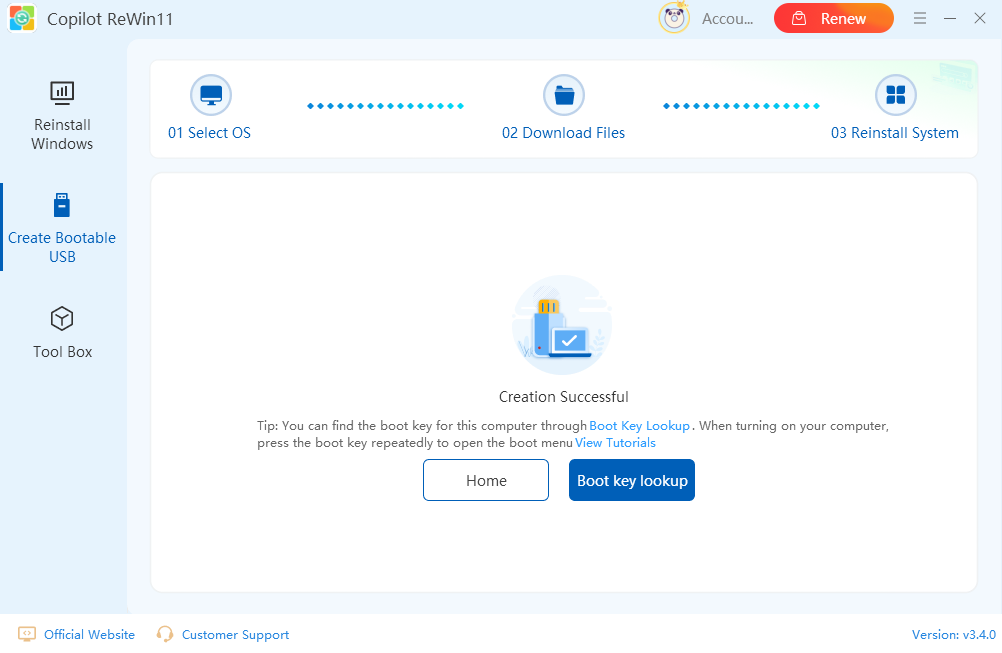
Boot Key Lookup: The software provides common boot keys for popular PC models. Select the key that matches your device to boot from the USB drive, or refer to the list of common boot hotkeys if your model is not listed.
3.3 How to Turn Off BitLocker Encryption on a Partition/Disk
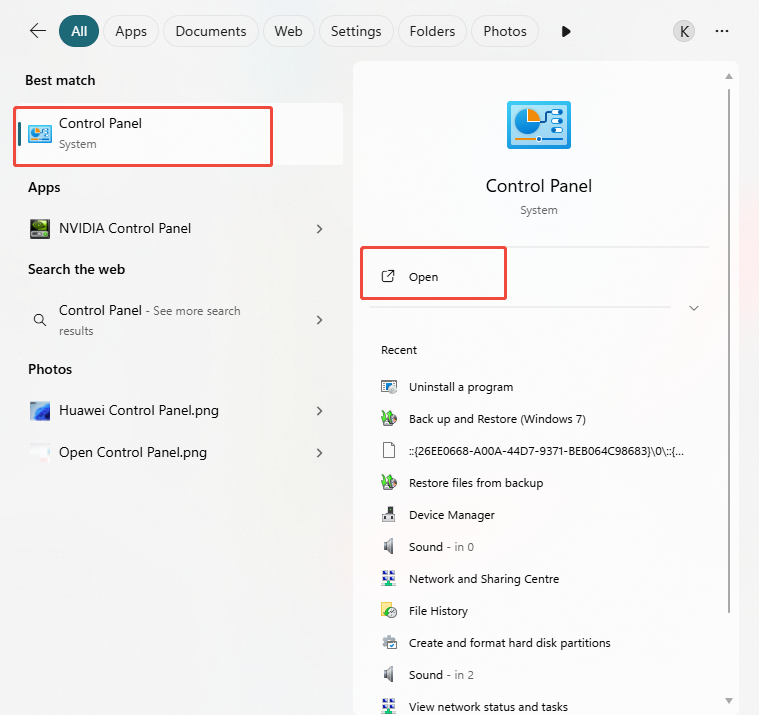
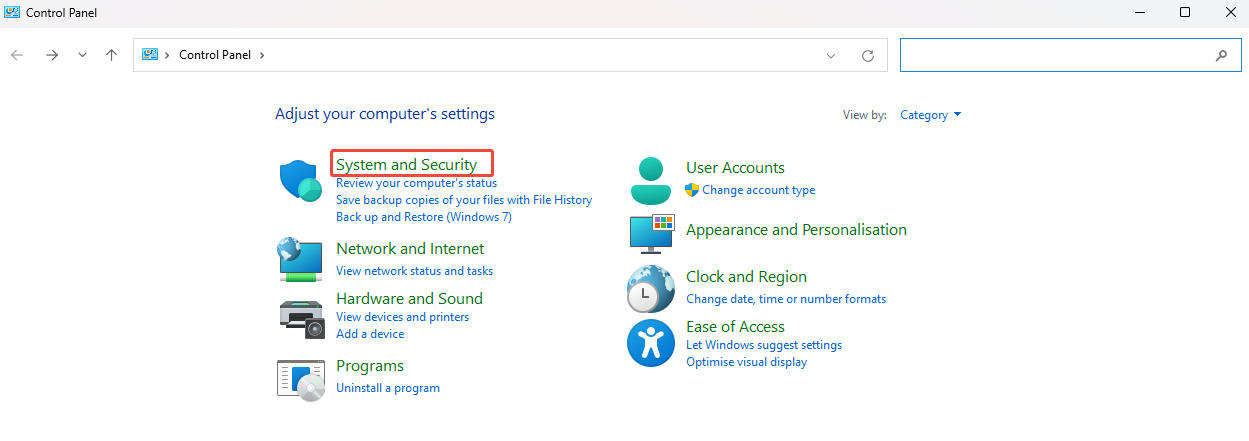
Step 1. Click the Search button at the bottom-left corner of your computer screen and type “Control Panel”, then open it from the search results.
Step 2. Go to System and Security, and it will take you to the page with security-related options.
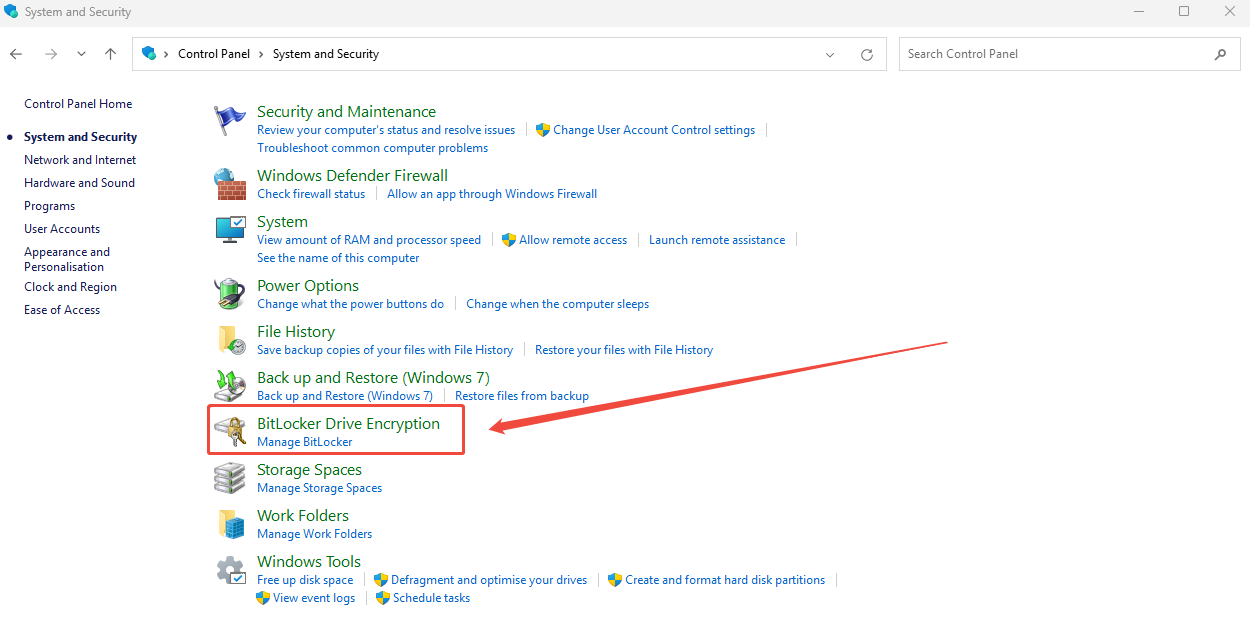
Step 3. Select BitLocker Drive Encryption. Here, you will see all drives on your computer and their encryption status.
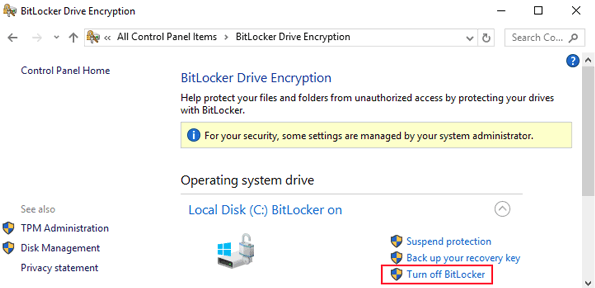
Step 4. Find the drive you want to decrypt. If the drive is encrypted, it will show as “BitLocker On.” Click “Turn Off BitLocker” next to that drive.
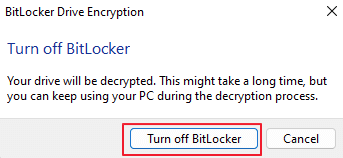
Step 5. In the confirmation pop-up, click “Turn Off BitLocker” again. The decryption process will begin and may take several minutes, depending on the size of the drive. Please be patient and do not interrupt the process.
Step 6. Once decryption is complete, click “Close.” The drive is now unencrypted and can be used normally.
Method 2: Using Command Prompt
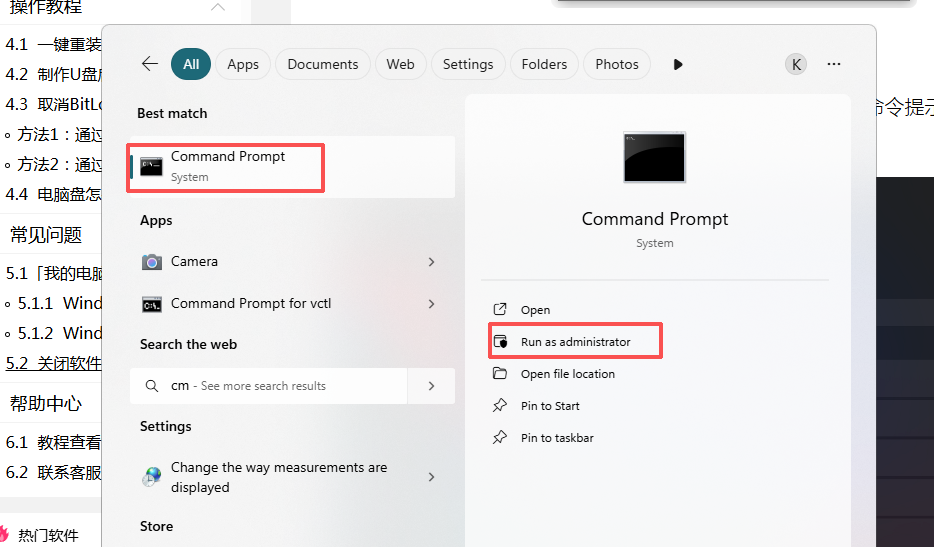
Step 1. Go to the Search menu in the bottom-left corner of your computer, type “cmd”, then right-click Command Prompt and select “Run as administrator.”
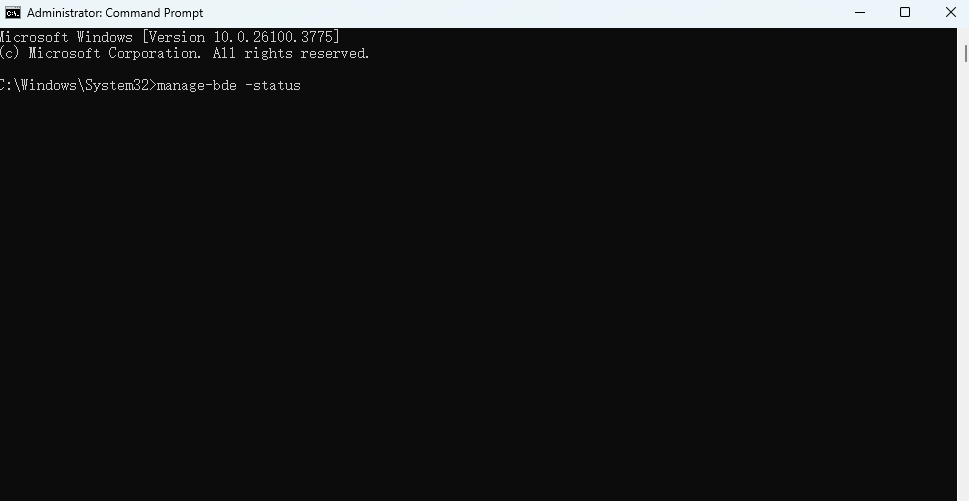
Step 2. In the Command Prompt window, type: manage-bde -status and press Enter to check the encryption status of your drives.
Step 3. To turn off BitLocker for a specific drive, type the following command, replacing D: with the letter of the drive you want to decrypt: manage-bde -off D:, and Press Enter.

Step 4. Wait for the decryption to complete. Do not interrupt the process, as doing so could cause data loss or corruption. Once finished, the drive will no longer be encrypted and can be used normally.
3.4 How to Partition a Drive
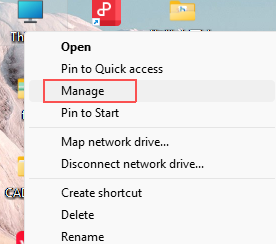
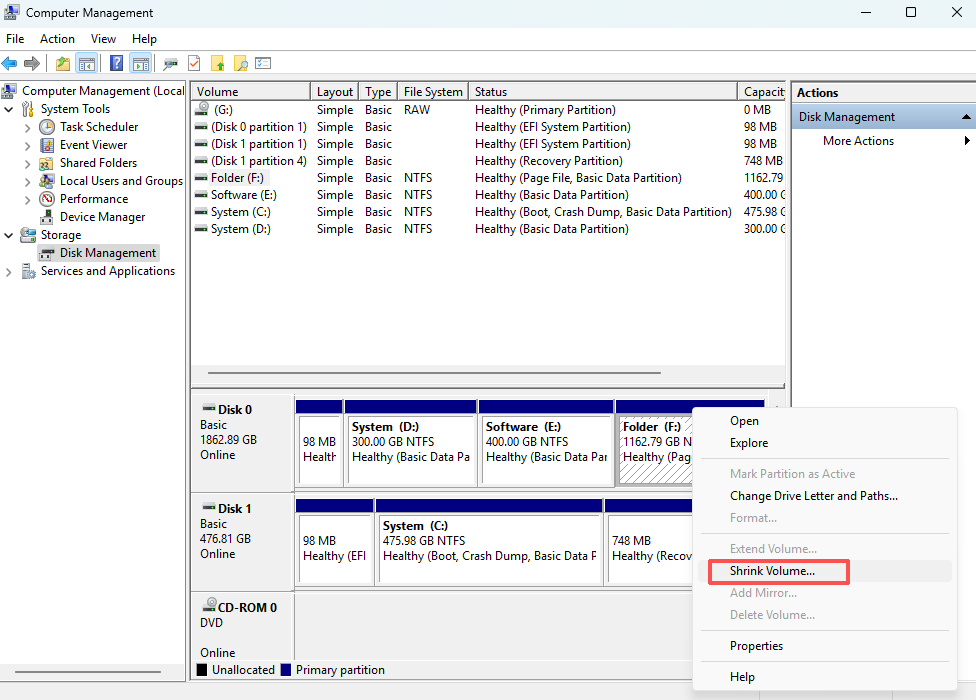
Step 1. Right-click “This PC” and select “Manage” to open the Computer Management window.
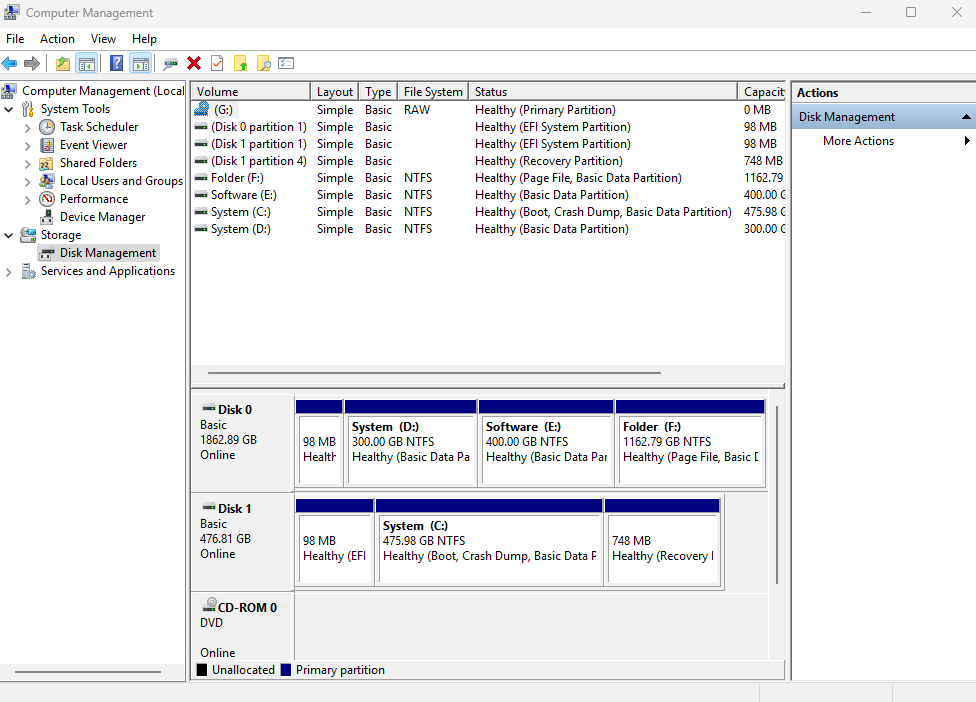
Step 2. In the left-hand menu, click “Disk Management” under the “Storage”. This will show all the drives and their current partitions.
Step 3. Select the disk you want to partition. Right-click on the disk and choose “Shrink Volume.” A window will appear asking how much space you want to allocate for the new partition. Enter the desired size and click “Shrink.”
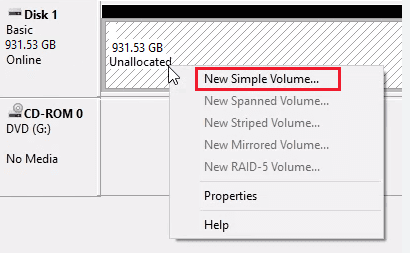
Step 4. After shrinking the volume, the unallocated space will appear on the disk. Right-click the unallocated space and select “New Simple Volume.”
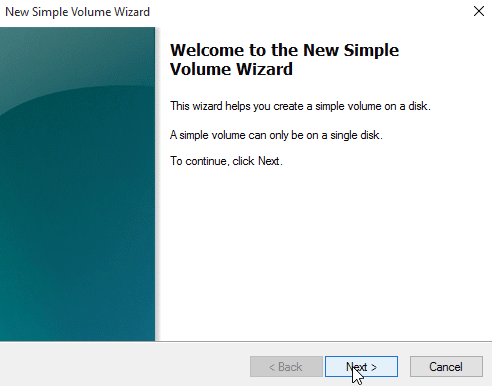
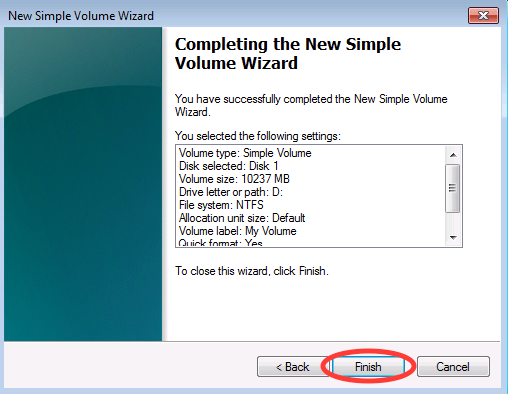
Step 5. Follow the New Simple Volume Wizard by clicking “Next” through each step. Assign a drive letter, choose a file system (NTFS is recommended), and format the partition.
Step 6. Once all settings are configured, click “Finish.”
4 FAQs about Using Copilot ReWin11
4.1 Show “This PC” Icon on Desktop
If the This PC (or My Computer) icon is missing from your desktop, you can easily restore it through the Personalization settings. Follow these steps depending on your Windows version.
4.1.1 Windows 10
Step 1. Right-click on an empty area of your desktop and select “Personalise.”
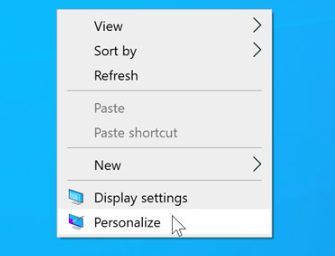
Step 2. In the Personalization window, click “Themes” in the left-hand menu, then select “Desktop icon settings.”
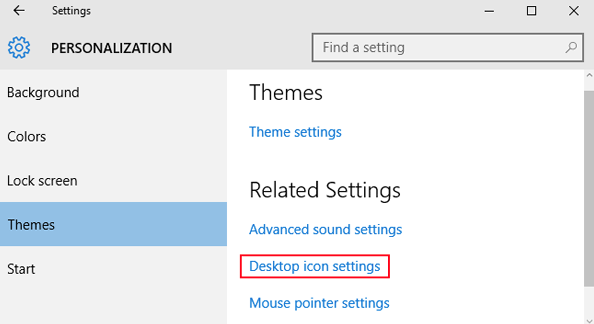
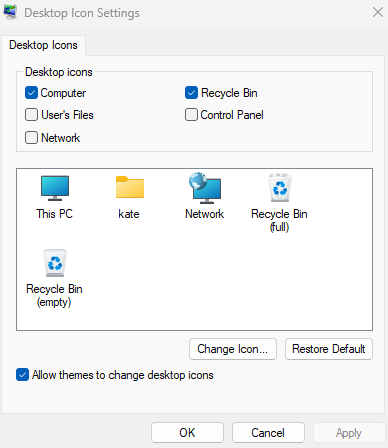
Step 3. In the Desktop Icon Settings window, check the box next to “Computer”, then click “Apply” and “OK.” The This PC icon will now appear on your desktop.

4.1.2 Windows 11
Step 1. Right-click on an empty area of your desktop and select “Personalise.”
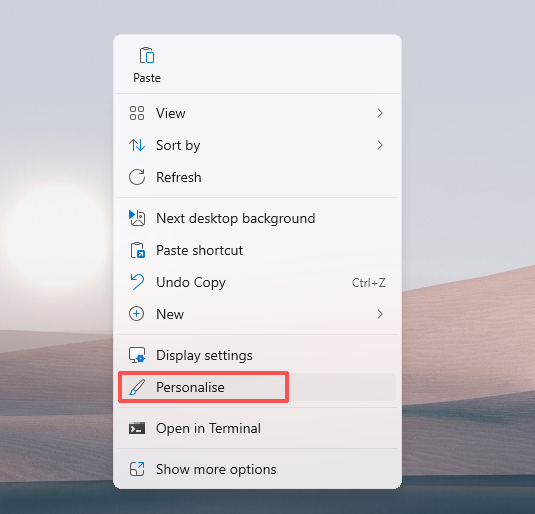
Step 2. In the Settings window, click “Themes” under the Personalisation section.
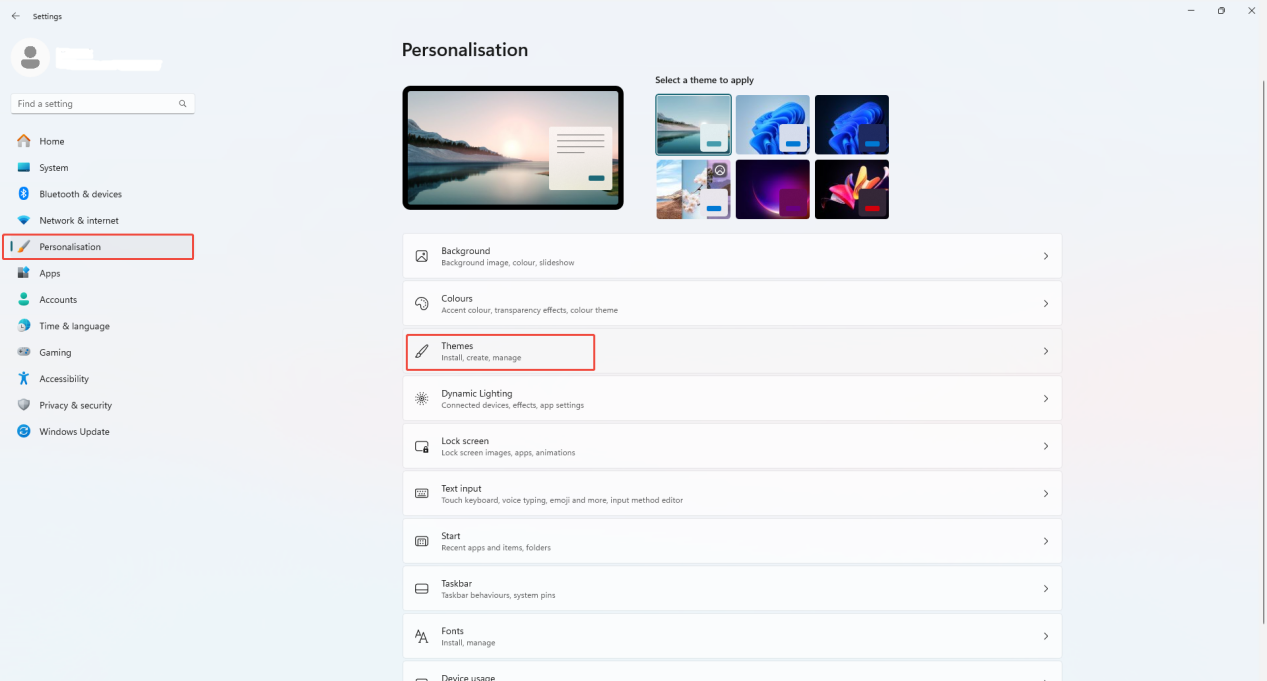
Step 3. Click “Desktop icon settings.”
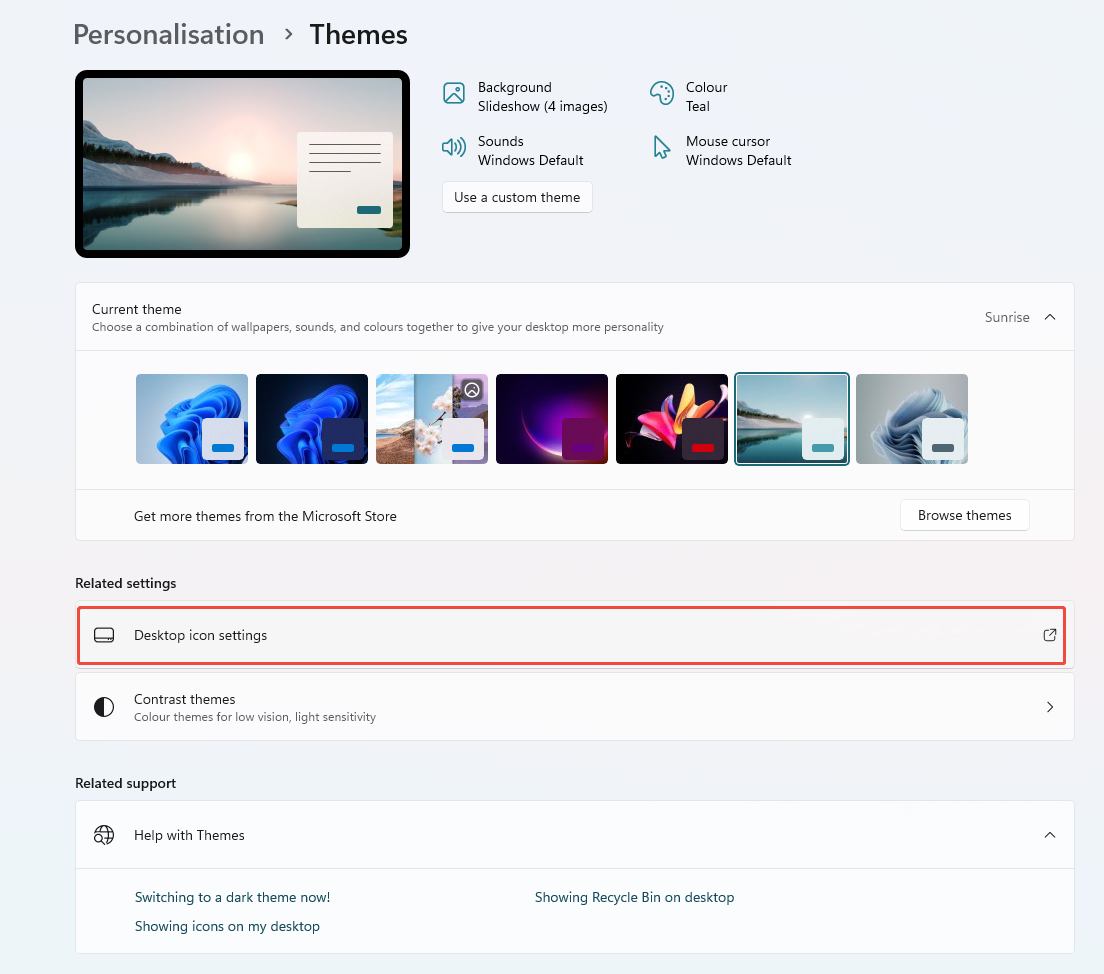
Step 4. Check “Computer” and click “OK.” The icon will now be visible on your desktop.
4.2 Disable Compatibility Mode for Copilot ReWin11
Compatibility mode allows older programs to run on newer Windows versions. However, for Copilot ReWin11, leaving compatibility mode enabled can cause system reinstallation to fail.
Step 1. Locate the shortcut of Copilot ReWin11 on your desktop. Right-click the icon and select “Properties.”
Step 2. In the Properties window, click the “Compatibility” tab. Under Compatibility mode, uncheck any selected boxes, then click “OK.”

5 Support and Help
If you have any feedback or suggestions on Copilot ReWin11, please do not hesitate to let us know. We are also enthusiastic about replying to all your questions about using it. Please feel free to contact us, and we'll help you right away.
Email: [email protected]
Submit Ticket: https://www.kingshiper.com/contact


 All
All


 Hot Products


