Multimedia Tools
Video Tools
Audio Tools
Image tools
Record and Edit Porfessional Videos on Mac
Windows Desktop Screen Recording Software
Easy and Fast Way to Compress Video and GIF
Screen Mirroring App for iPhone/Android/PC/Pad
All-in-one video toolkit that supports converting over 1000+ formats
Portable audio format converter, which supports common audio format conversion, multiple audio merging, audio compression, audio segmentation, and one click batch conversion of audio formats
Karaoke Maker and Vocal Extractor on Mac
Cut, copy, paste, insert audio, add effects and other editing functions, which can easily re edit the recorded audio files and make ringtones, adding a unique personality to your life.
Extract vocals and instrumentals from any audio and video track with the latest AI technology.
Best Voice Recording Software for All Windows Users
Convert Audio/Video to MP3/WAV/FLAC/OGG
Utilities
Office Utilities
Simple and powerful office solution for file compression, extraction, transferring, and sharing. Easily to process multiple files in seconds!
A powerful, simple and easy to operate PDF to word converter, which supports the conversion between PDF documents and multiple formats such as doc, ppt, pictures and txt documents; The software has the functions of fast conversion, batch conversion, high-quality identification, etc
Fast Way to Reduce Your File Size
The best and perfect tool to convert various ebook files with ease.
Convert Videos, Audios, Images, PDFs, and Word with Ease
Seamless Conversion for PDF to JPG & JPG to PDF
Shrink size of PDFs, images, and videos without losing quality
Extract & Manage & Compress Files in Seconds
System & Recovery
If you’re looking for guides to share screen with OBS, whether you're live streaming, recording, meeting, or something else, this is for you.
Though OBS does not have a native, one-click "screen share" button like Zoom and Discord, you can use it to capture and broadcast the screen content you set, for example, during a live stream, presentation, or virtual meeting.
That is to say, OBS screen sharing is done by adding capture sources, which can then be customized.
Explore how to screen share in OBS now.
There are two main functional menus involve - the Scenes and the Sources.
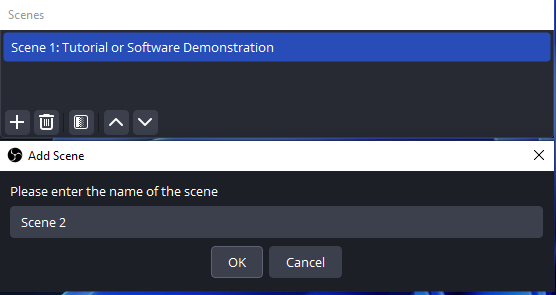
a. Add Scene: click + > give a name for this creating scene > OK.
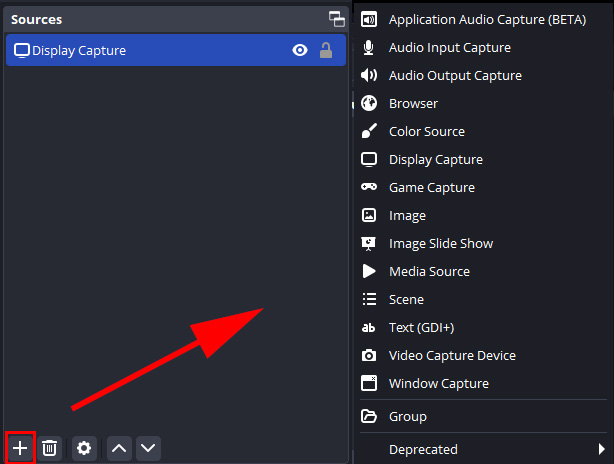
b. Add Source: click + > choose a capture option > name it > OK > finalize the settings in the pop-up window > OK.
You can add one or more scenes and sources as needed for your scenario. While the type of capture may differ, the process is the same.
For example, for tutorial or software demonstration, you can add Display Capture, Window Capture, and Video Capture Device (for Webcam) and put the sources together.
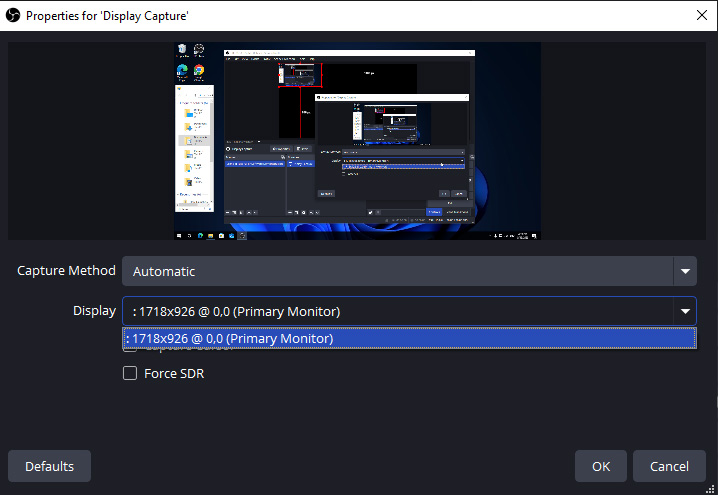
Want to share the whole monitor screen including multiple applications or full presentations, you should choose Display Capture.
Step 1. Click + > select Display Capture.
Step 2. Name it and click OK.
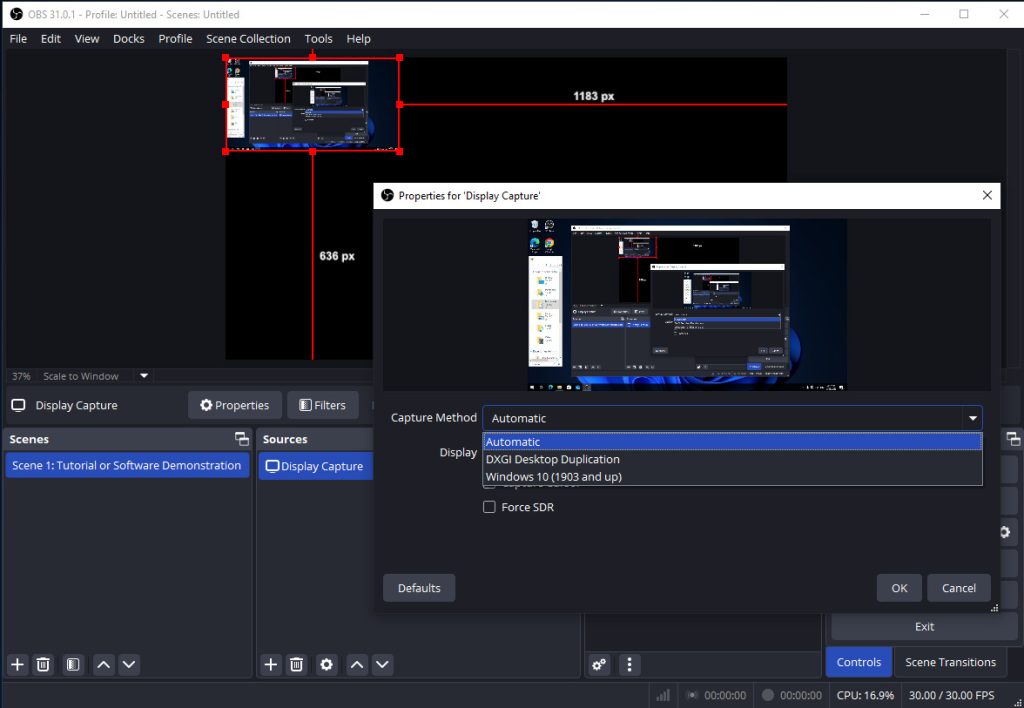
Step 3. When the Properties window appears, drop down the menu of Capture Method. Select Automatic.
Step 4. In Display, select the desktop monitor you’re using.
Step 5. Click OK.
Now you can see the desktop screen showing in the preview window. When you screen share OBS, this is the viewer's perspective.
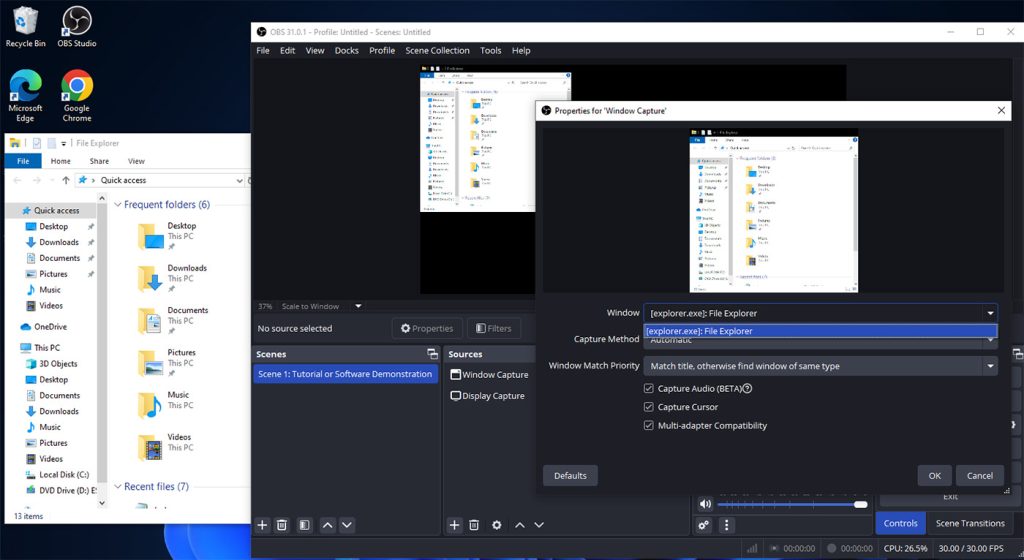
Use Window Capture to share a specific application or window. It’s perfect for concentrating on one program, and only the selected program is visible while other desktop elements remain hidden.
Step 1. Name the window capture and then click OK.
Step 2. Select the window or application in Window.
Step 3. Click OK.
Note:
1) Permission issues, OBS may require administrator rights to capture certain windows.
2) Compatibility mode or capture method problems: sometimes OBS’s default capture method doesn’t work well with certain applications or system configurations.
3) Multi-GPU or graphics driver conflicts: Systems with integrated and dedicated GPUs (like laptops) can cause capture problems. Use Windows 10 capture mode helps in these cases.
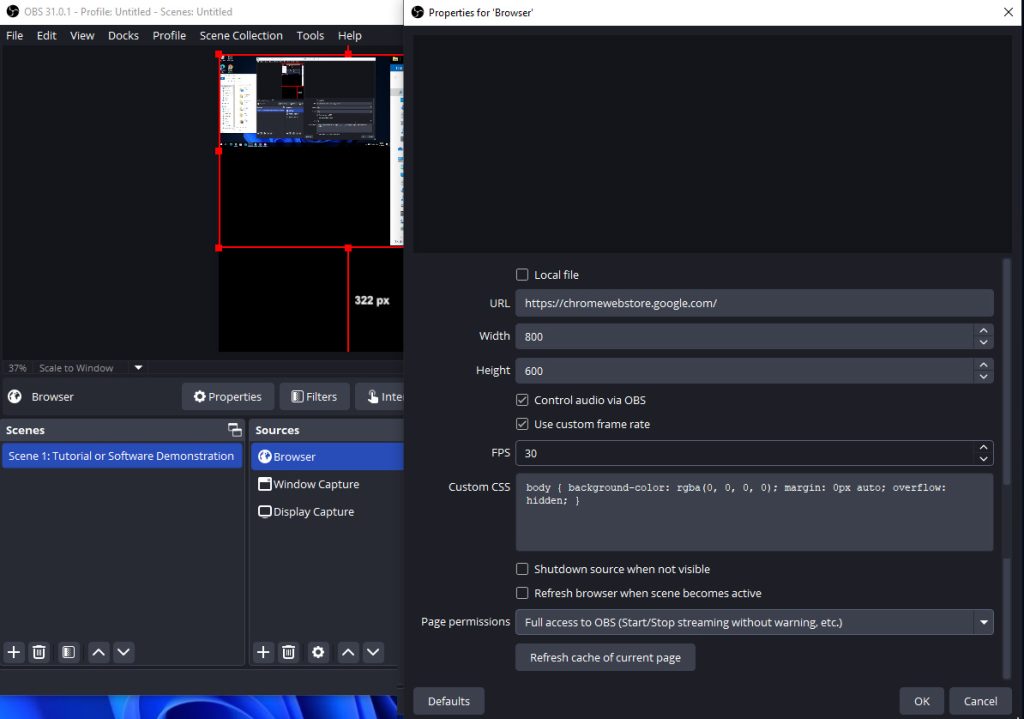
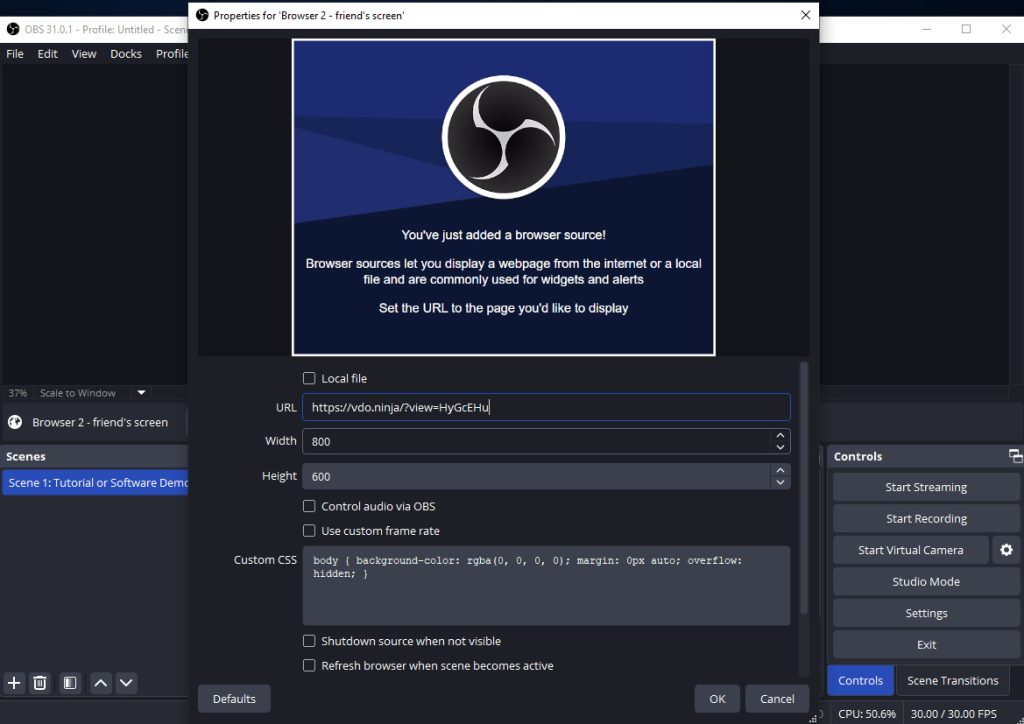
Browser Source is useful for live displaying online content.
Step 1. Choose Browser.
Step 2. Enter a URL.
Step 3. Adjust Width and Height (default is 800x600).
Step 4. (Optional) Custom CSS allows you to control the appearance of web-based content.
Step 5. Set Page Permissions if you want third-party widgets function properly.
If you want to stream or record a friend’s computer screen, like, during a game, OBS make it possible. And you need a tool with screen share feature to help.
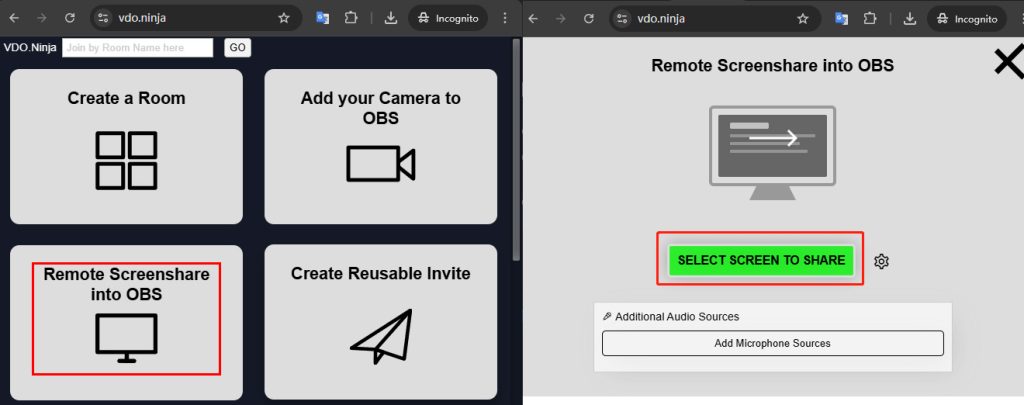
Options are various. For example, use Discord or VDO.Ninja.
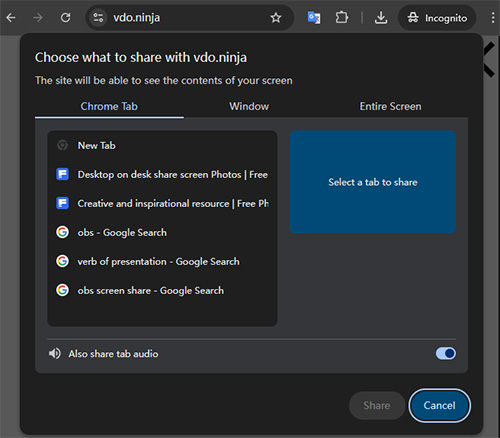
Step 1. First, initiate screen sharing to view your friend's computer.
● Ask your friend to open VDO.Ninja in his/her Chrome browser.
● Click Remote Screenshare to OBS.
● Select Screen to Share.
● Copy the generated link.
● Ask your friend to share the link.
Step 2. Your turn. Add Browser in OBS’s Sources.
Step 3. Paste the shared URL.
Step 4. Click OK.
Now, you can see your friend’s screen in OBS.
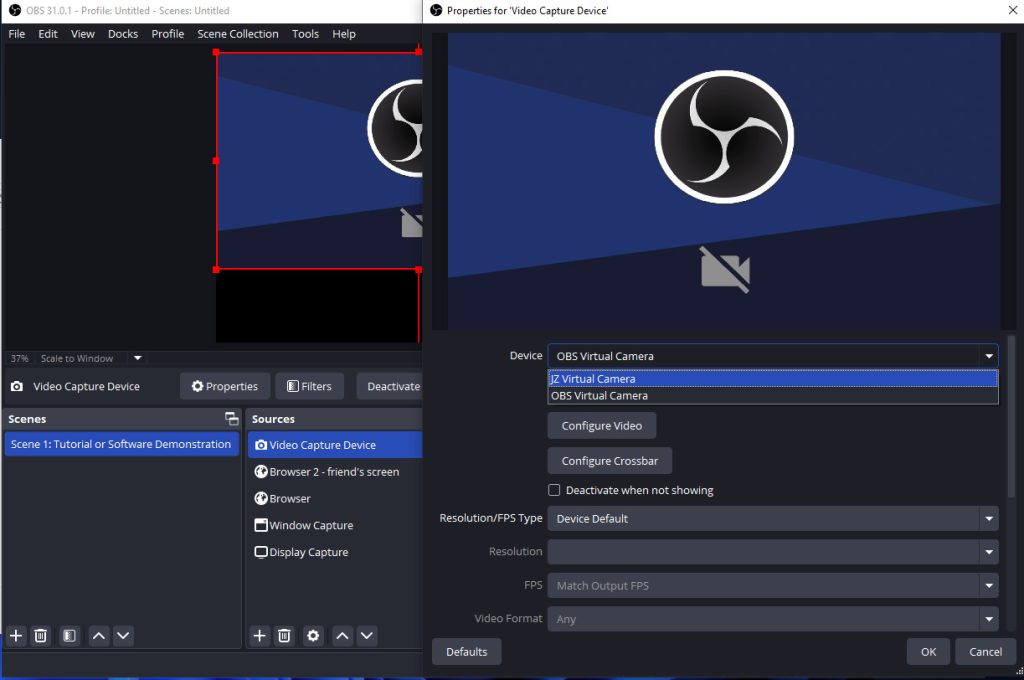
In some cases, you may want to show your face during a live feed by implementing a Picture-in-Picture effect. In OBS, you can add a webcam to capture yourself and share it along with your content. The required capture source is a Video Capture Device.
Step 1. After choosing Video Capture Device, choose your camera or webcam software in Device.
● For physical external webcams: it will auto show up as you connect it to the computer.
● For webcam software: if you're using your phone as a webcam, first open its dedicated software and complete the necessary settings. Then, in OBS, select the software name to display your phone's camera feed.
Step 2. Click OK.
You can see yourself displaying in OBS immediately.
1) Add Video Capture Device in Sources to show the presenter's face.
2) Add Display Capture or Window Capture to share the entire screen or a specific application window (e.g., PowerPoint, browser, or software demo).
3) Click Start Virtual Camera to output the OBS content.
4) On your meeting app (e.g. Zoom or others), go to Settings > Video > Choose "OBS Virtual Camera" as your camera source.
5) Click share screen in the meeting app.
1) Add Game Capture to share the gameplay window.
2) Add Video Capture Device for webcam effect.
3) (Optional) Add Browser if you want to capture a remote screen.
Or, add Window Capture if using a screen mirroring software for phone screen capture.
4) Click Start Streaming.
For higher video quality, you can manually resize each sources. In addition, you can optimize the output settings.
a. Go to Settings > Output > Output Mode > Advanced.
b. Set Recording Quality to Indistinguishable Quality or higher.
For sharing different screens in a presentation, you can make good use of the Scene feature. Create different scenes and allocate one capture source for each. When you start streaming or recording, click on the scene that you want people see. OBS will display the selected one and transform seamlessly.
Once you've combined different captures in OBS, making them a single unified screen, you can share it to other platforms. Here’re some popular.
Examples: Twitch, YouTube Live, Kick, Facebook Live,Instagram Live, TikTok Live, Trovo, etc.
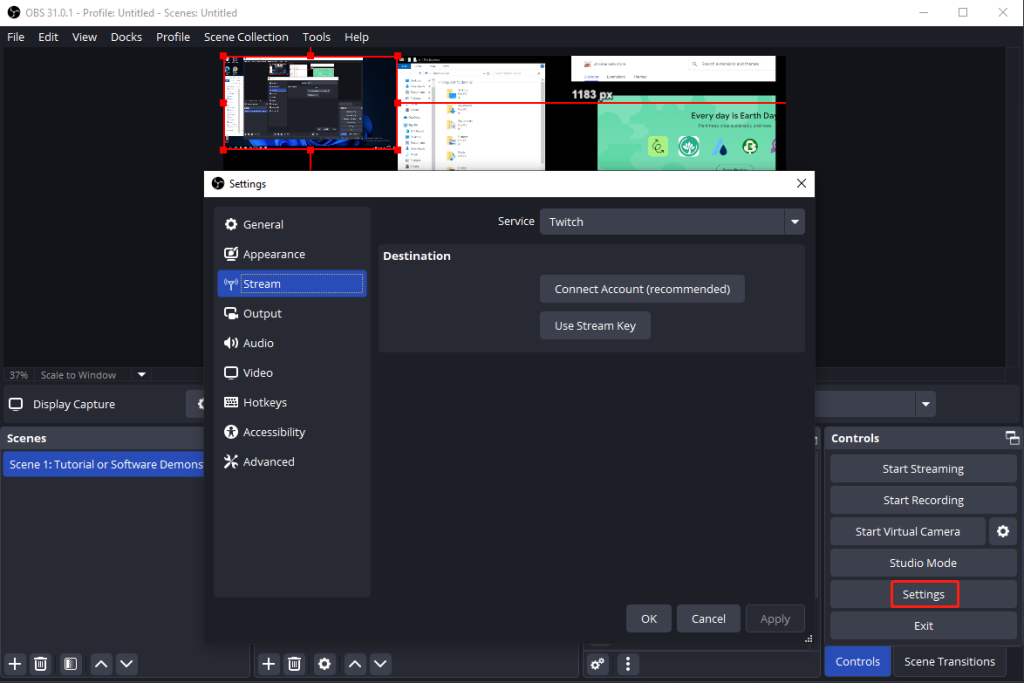
You need to bind your platform account with OBS in OBS Settings > Stream.
Once connected, just click Start Streaming and the OBS screen will go live.
Examples: Zoom, Microsoft Teams, Google Meet, etc.
If you’re already in a meeting, just click Video and choose OBS Virtual Camera.