Got it

How to Screen Capture on Asus Laptop [with Tips]

Q: Can I Screen Capture on Asus Laptop?

The answer is definitely yes.

Asus laptops support various screenshot methods, making it easy for you to capture screen content.

You can take screenshots on an Asus laptop in several ways. This post will discuss how to take a screenshot of an Asus laptop. Other than using keyboard shortcuts, there are other ways that are more convenient and efficient.

Method 1. How to Screen Capture on Asus Laptop with Free Screen Recorder

Compatibility: Windows 7/8/10/11

Support screenshot format: JPEG, JPG, PNG, BMP

Best for: Novices and professionals dealing with various screenshot and recording needs on laptop

Kingshiper Screen Recorder is a free screen recording software that helps you easily capture screen, sound, webcam, and record screen on an Asus laptop. Whether you want to record high-quality videos, capture gameplay, or record online meetings, you can use this screen recorder to capture content in just a few simple steps with this tool.

Moreover, it also lets you record both system sound and microphone, helping you create high-quality video content.

Download Kingshiper Screen Recorder to your Windows or Mac. Let’s see how to screen capture on Asus laptop now.

Kingshiper Screen Recorder

Official

Download

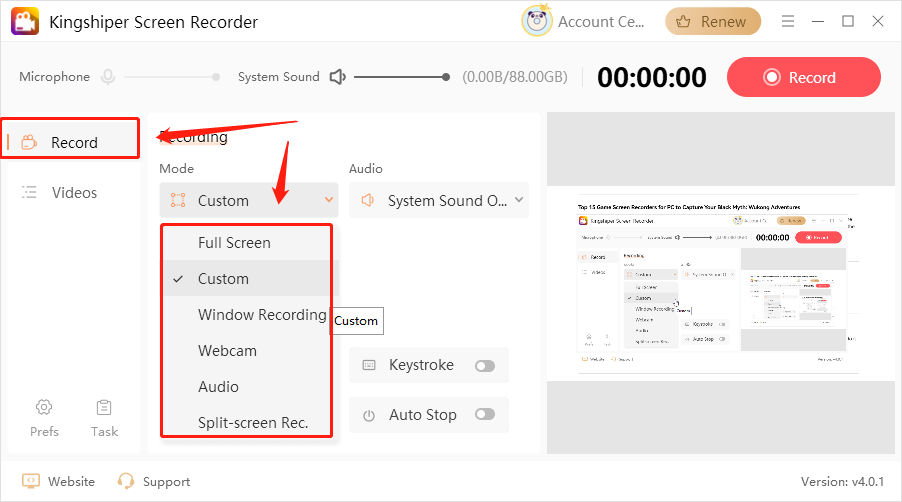
Step 1. Launch Kingshiper Screen Recorder on your Asus laptop. In the “Record” section, select a recording mode that includes the specific region you want to capture.

kingshiper-screen-capture-asus-laptop

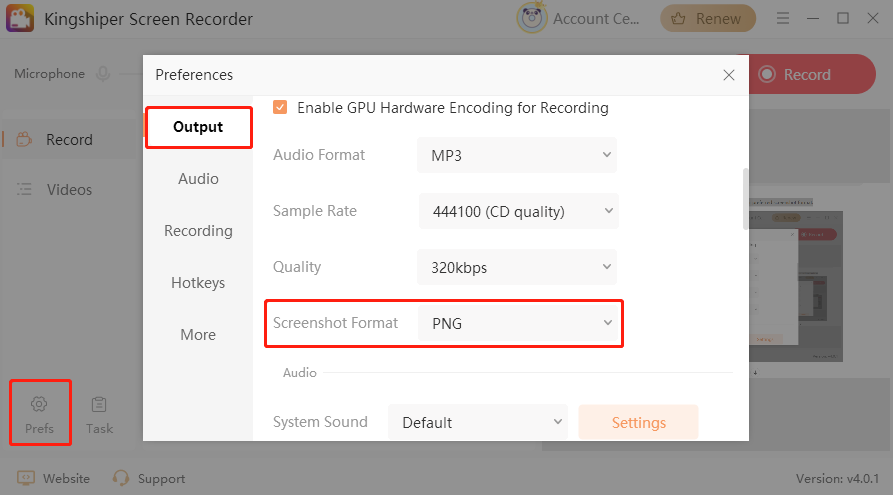
Step 2. In the Prefs > Output section, you can choose your preferred screenshot format.

kingshiper-screen-capture-asus-laptop-2

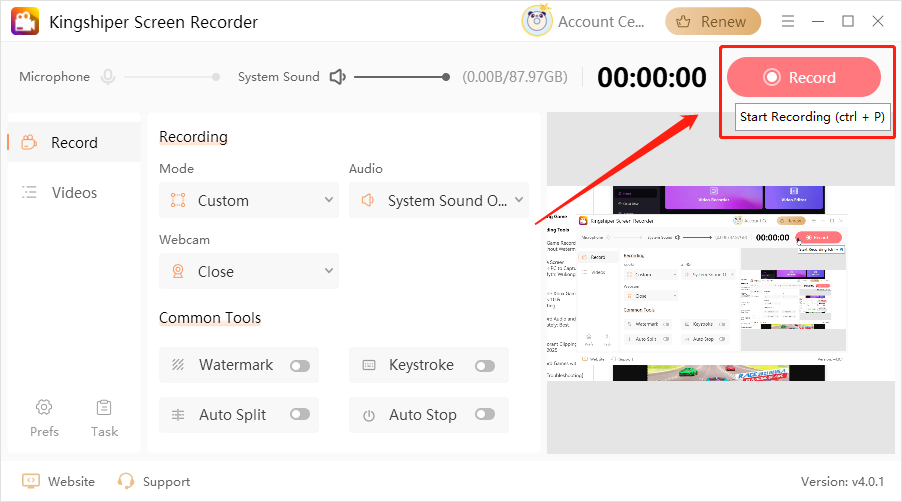
Step 3. Now back to the home interface. Click on the red “Record” button in the top right corner.

kingshiper-screen-capture-asus-laptop-3

Step 4. Then you will see a floating boat like the image below. You can click on the “Capture” icon to take a screenshot during the recording.  

kingshiper-screen-capture-asus-laptop-4

Step 5. Once you’ve captured your gameplay, click on the “Stop Recording” icon. Then, you can go to the “Videos” list to check your file.

kingshiper-screen-capture-asus-laptop-5

Method 2. How to Screen Capture on Asus Laptop with Windows Hotkeys

Compatibility: Windows 7/8/10/11

Support screenshot format: PNG

Best for: A quick and easy way to capture the full-screen

How can you quickly capture the entire screen on your Asus laptop? Don’t worry. If you prefer a simple and fast method, Windows shortcuts are a much easier way. This method works across all versions of Windows, including 7, 8, 10, and 11, making it especially useful for users who need to take quick screenshots without using third-party software. However, it's important to note that using hotkeys only captures full-screen images and cannot target specific windows or regions. See the tutorials below:

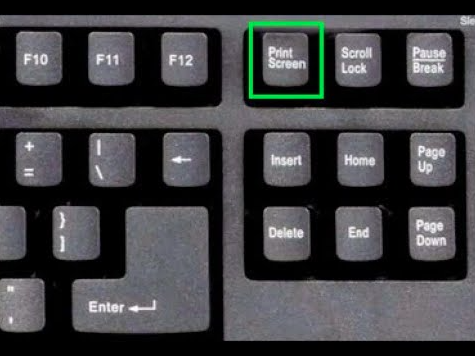
Step 1. Find and press the Print Screen or Prt Scn SysRq key on your laptop keyboard.

Step 2. After pressing the key, the screenshot will be automatically saved to your clipboard.

Step 3. To use the screenshot, you can press “Ctrl + V” to paste it into other programs.

print-screen-capture-asus-laptop

Method 3. How to Screen Capture on Asus Laptop with Snipping Tool

Compatibility: Windows 7/8/10/11

Support screenshot format: PNG, JPEG, GIF, HTML

Best for: Flexibility in selecting specific screen regions.

The Snipping Tool is a built-in Windows utility that offers a straightforward way to capture screenshots on your Asus laptop. It gives you the flexible ability to capture the entire screen, a freeform selection, a rectangular area, or just the active window. Moreover, this tool is simple to use requires no extra software, and is perfect for those who need precision in their captures. You can also annotate and save screenshots in different formats.

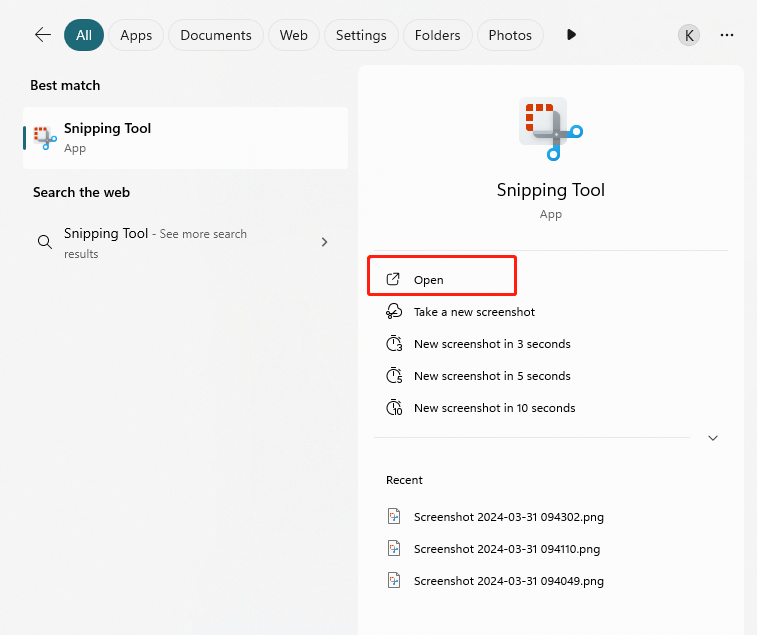
Step 1. Type “Snipping Tool” in the Windows search bar and click on “Open” to launch the app.

snipping-screen-capture-asus-laptop

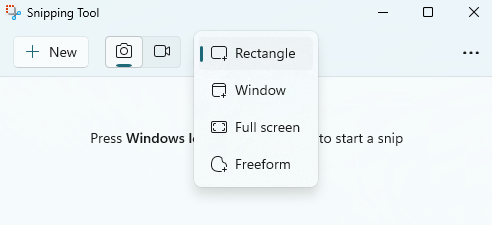
Step 2. Click "Snipping Mode" to select a snipping style, including rectangle, window, freeform, or full screen.

snipping-screen-capture-asus-laptop-2

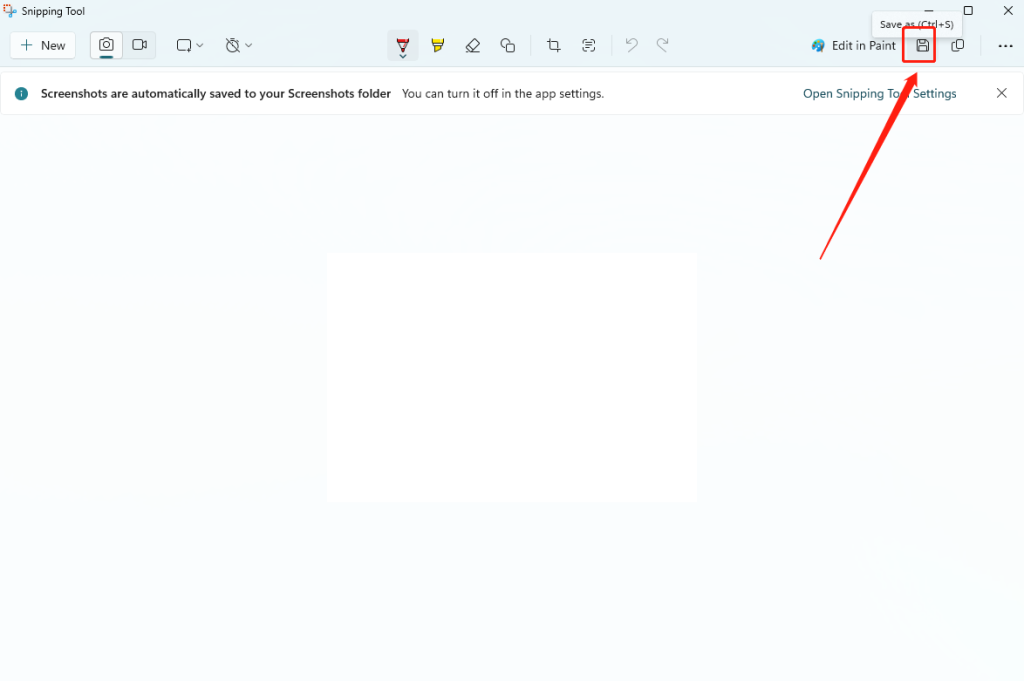
Step 3. Click "New" and drag your cursor to select the area. Release to capture. Then, you can use the pen to edit your screenshot. Once done, you can click the “Save” icon or press “Ctrl + S” to save your image.

snipping-screen-capture-asus-laptop-3

Method 4. How to Screen Capture on Asus Laptop with Third-Party Screenshot Tools

Compatibility: Windows 7/8/10/11

Support screenshot format: PNG, JPG, BMP

Best for: Advanced users needing features like scrolling capture, GIF creation, or cloud integration

Snipaste is a lightweight, free screenshot tool renowned for its unique "pin to screen" feature and precision editing tools. It not only supports standard screen captures but also provides advanced options like scrolling capture, on-screen editing, and even cloud integration for quick sharing.

Step 1. Download and install Snipaste from the Microsoft Store.

Step 2. Launch this screen capture tool and go to its settings to customize keyboard shortcuts.

Step 3. Now you can start a screenshot with your hotkeys.

Step 4. After capturing, you can press F3 to overlay the image on your screen. Then press “Ctrl + S” to export as a PNG or JPG screenshot.

snipaste-screen-capture-asus-laptop

Method 5. How to Screen Capture on Asus Laptop with Microsoft PowerPoint

Compatibility: Microsoft Office 2010 or later (Windows/macOS)

Support screenshot format: PNG, JPEG

Best for: Quick screenshots for presentations or documentation.

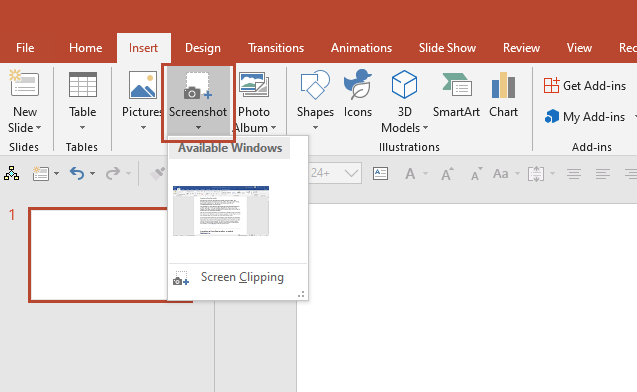
Microsoft PowerPoint also offers a built-in screenshot tool that allows you to capture and embed screen content directly into presentations. This option will display thumbnails of any open windows on your Asus laptop, so you can choose the region you want to capture. This feature is ideal for professionals, educators, or anyone creating tutorials, guides, or demonstrations.

Step 1. Launch PowerPoint on your Asus laptop and create a presentation.

Step 2. Go to the “Insert” tab and click on the “Screenshot” on the top menu bar. Here, you can choose to capture an open window or use screen clipping.

Step 3. Once the screenshot is inserted, you can use the “Crop”, “Annotate”, “Enhance”, or “Remove Background” under the Picture Format tab.

Step 4. In addition, you can right-click the image in the slide > Save as Picture > Choose PNG/JPEG format and save it to your laptop.

microsoft-screen-capture-asus-laptop

Extra Tips: 4 Useful Screen Capture Tips for Asus Laptop Users

To achieve better screenshot results, consider the following tips:

  • Use Keyboard Shortcuts

On your Asus laptop, the fastest way to capture your screen is by using some keyboard shortcuts. For example, press ”PrtScn” to capture the entire screen, ”Alt + PrtScn” to capture the active window, or ”Windows + Shift + S” to select and capture a specific area.

  • Capture Screenshots While Recording

If you need to take screenshots while recording your screen, Kingshiper Screen Recorder is an excellent tool. Simply click the "Capture" button during recording to save the current frame instantly. 

  • Change the Default Screenshot Save Location

By default, if you use the Windows hotkeys to capture the screen, the screenshots are saved in the "Pictures" folder. You can change the save location by going to “Settings” > “System” > “Storage”.

For third-party software like Kingshiper Screen Recorder, the save location can be adjusted under “Preferences” > “Output”.

  • Customize Screenshot Hotkeys

If you frequently take screenshots, you can create custom hotkeys in “Settings” > “Accessibility” > “Keyboard” to make the process quicker and more efficient.

Final Thoughts

Now that you have learned how to take a screenshot on an Asus laptop. We have shown you five simple methods and shared some helpful tips to let you have the best screenshot experience on your laptop. Depending on your needs, you can use hotkeys or built-in tools to capture your screen quickly and efficiently. If you’re someone who wants to take high-quality screenshots, Kingshiper Screen Recorder is one of the most powerful snipping tools available, enabling you to capture specific parts of your screen with ease and even record your screen. Therefore, why not download it now?

Latest Articles